Request a demo
Tell us about yourself, and we'll be in touch right away.

Site settings allow the admin to modify content visibility and rating anonymity as per their preferences with provisions to edit the name of the site, description, tag, email id, currency, and so on. The trip fare is set either by admin or taxi companies
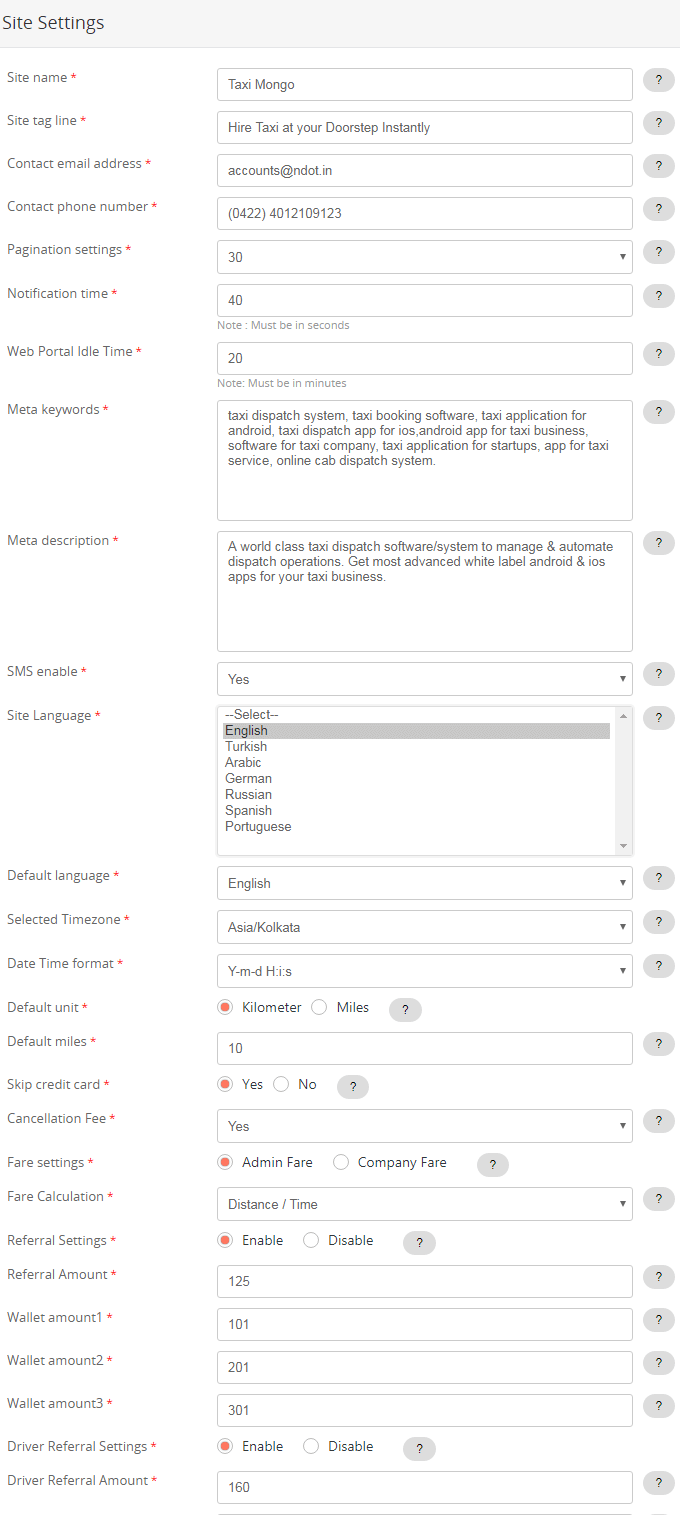
The drivers are given 20 seconds, set by default, to accept a passenger request. This Notification time can be modified based on the preferences of the dispatchers. Idle or inactive user sessions will be automatically timed out to improve system security. The idle time can be set in the back end.
There is a provision to record a message and automatically send the recorded message to a friend for company referral. The admin can also add meta keywords and meta description for easy search, and can choose to enable or disable SMS facility that notifies users via messages.
The distance covered by a taxi can be calculated either in kilometers or miles, and the minimum distance can be set as per preference, and these can be edited in the ‘Default Units’ and ‘Default Miles’ settings respectively.
The companies can either give their users the option to pay by cash and credit card or just by cash by enabling or disabling the facility using ‘Skip credit card’. It is at the discretion of the company whether to charge the users with a cancellation fee for every ride that is canceled.
The taxi fare is either set as ‘Admin fare’ or ‘Company fare’. The fare set for each vehicle type by admin is common and same for all taxi companies, and the fare set by a particular taxi company is based on its own preferences. The fare can be calculated based on the distance covered by a taxi, or considering the distance and the time, or just by the time taken to complete the ride.
Application language can be set by select language option, which will be reflected in both web and mobile apps.
Tooltip is provided with information about each item being hovered over. If the admin enables the ‘Referral Settings’, users earn a bonus for each referral, which is set as ‘Referral amount’. The referral program can also be enabled for drivers, similarly.
There is the facility to credit a certain amount of money to the wallet for easy and quick transactions during future rides. The first three choices are set by default, including the minimum and maximum amount that can be credited, as ‘Wallet amount 1’, ‘Wallet amount 2’, and ‘Wallet amount 3’ to click and choose from any of the three. There is also an option to modify the range of amount as preferred, for instance, 5-150. In this case, the minimum amount that can be added to the wallet is 5 and the maximum is 150.
The admin can record the site name, site, tagline, and contact details such as email address and phone number for the site. The number of pages to be displayed at a time can be modified as preferred, in the Pagination settings.
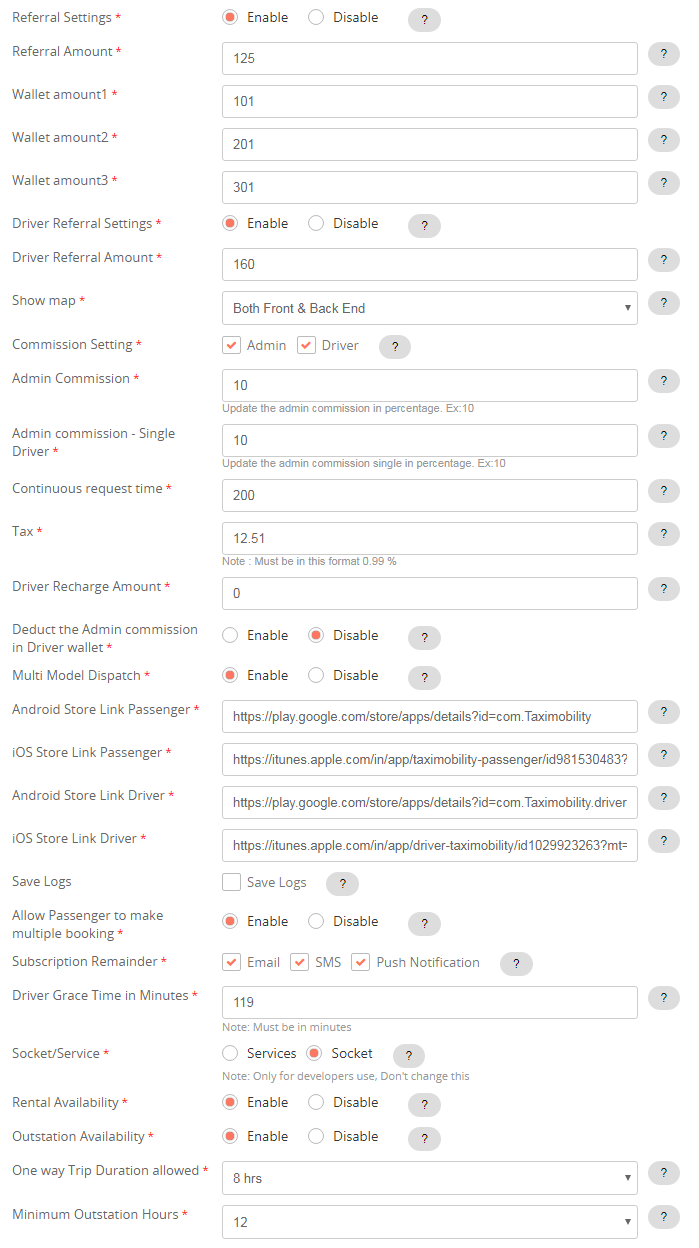
be visible to the passengers even after the wallet amount goes below the minimum amount by selecting either ‘Enable’ or’ Disable’.
The multi-model dispatch option can be enabled or disabled in the back end. The passenger is availed with other options in vehicle types for the same fare if the requested vehicle is unavailable.
It is at the company’s discretion whether to charge tax from users for the rides. The requests for taxi rides are prompted every 90 seconds by default. The time can be modified under ‘Continuous request time’.
The APIs of Google Maps and options to incorporate the company logo, logo for email, and the company image are included in the site settings. The links to download the passenger and driver apps from the Android and iOS stores, and the links to the Facebook, Twitter, and Google+ pages are also provided. The admin can choose to either Save the logs or not of all user activities.
The admin can enable or disable the multiple-booking option to allow or prevent passengers to/from book cabs for others even when if he is on a trip.
Besides, the mode of receiving subscription reminder whether through email, SMS, or push notification has to be set here.
Set the grace time for drivers to be visible in the passenger app.
Socket/service option cannot be changed.
If you are providing rental and outstation packages, then the respective options have to be enabled.
Likewise, you can set a duration for the one-way trip and outstation hours.
The visibility to Google Maps that locate taxis and drivers can be modified as viewable at both front end and back end, or only at the front end, or only in the admin panel. An admin fee can be generated automatically for each trip undertaken by a taxi company using the ‘Admin commission’ option.
The Admin can recharge the driver wallet with a certain amount. When the driver receives the ride fare from a passenger in cash, the commission for the Admin will be deducted from the amount recharged in the driver wallet. If the passenger pays through the card, the driver commission will be added to the wallet. Once the amount in the wallet goes below the Minimum wallet amount, the driver will not receive any ride requests. Admin can also decide whether the driver should
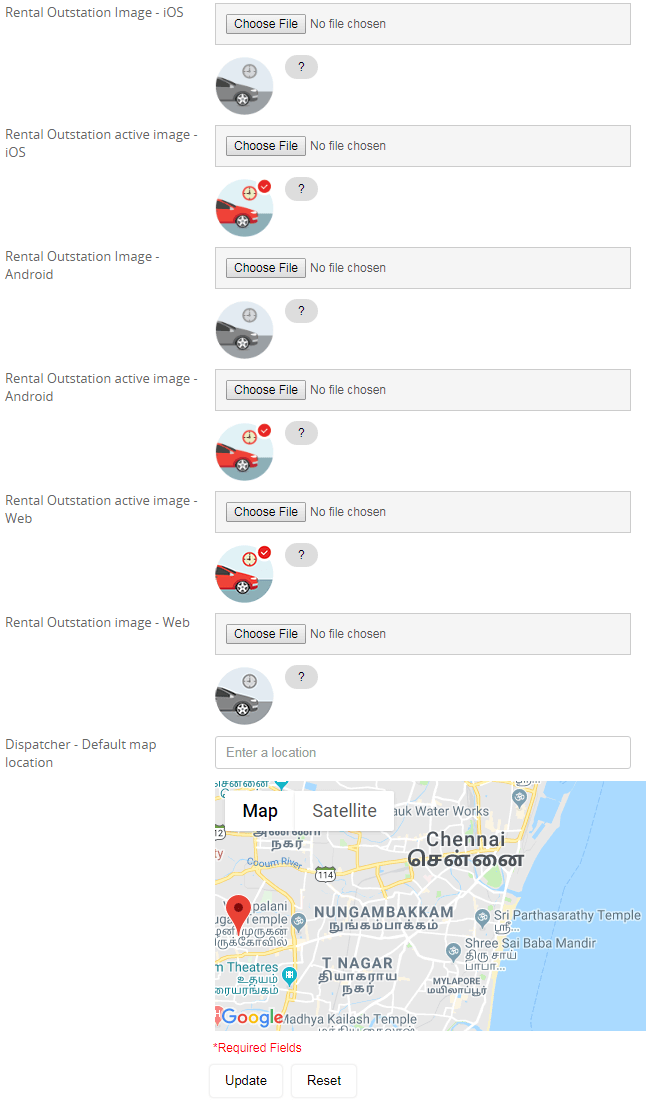
You can upload images for rental and outstation if you prefer to use any specific image to be displayed in Android, iOS, and web applications. You can set the default map location to be displayed for dispatchers.
The admin can make map settings that can be supportive in displaying various maps related to dispatching and booking, heatmaps, route directions, distance calculation, and place details form.
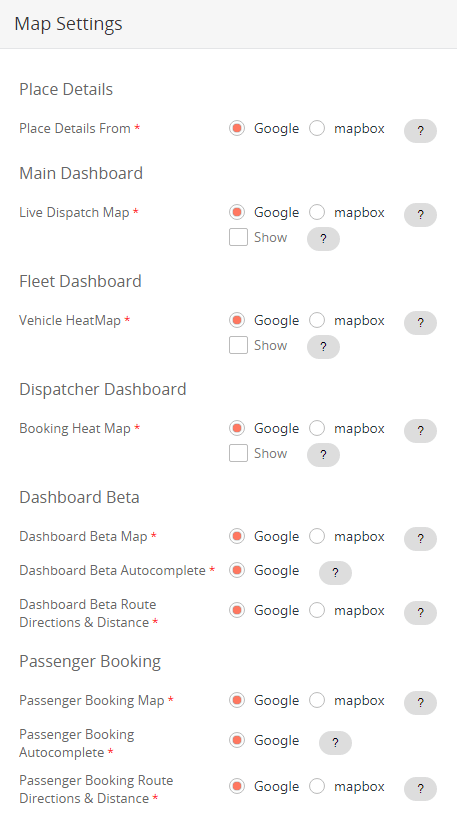
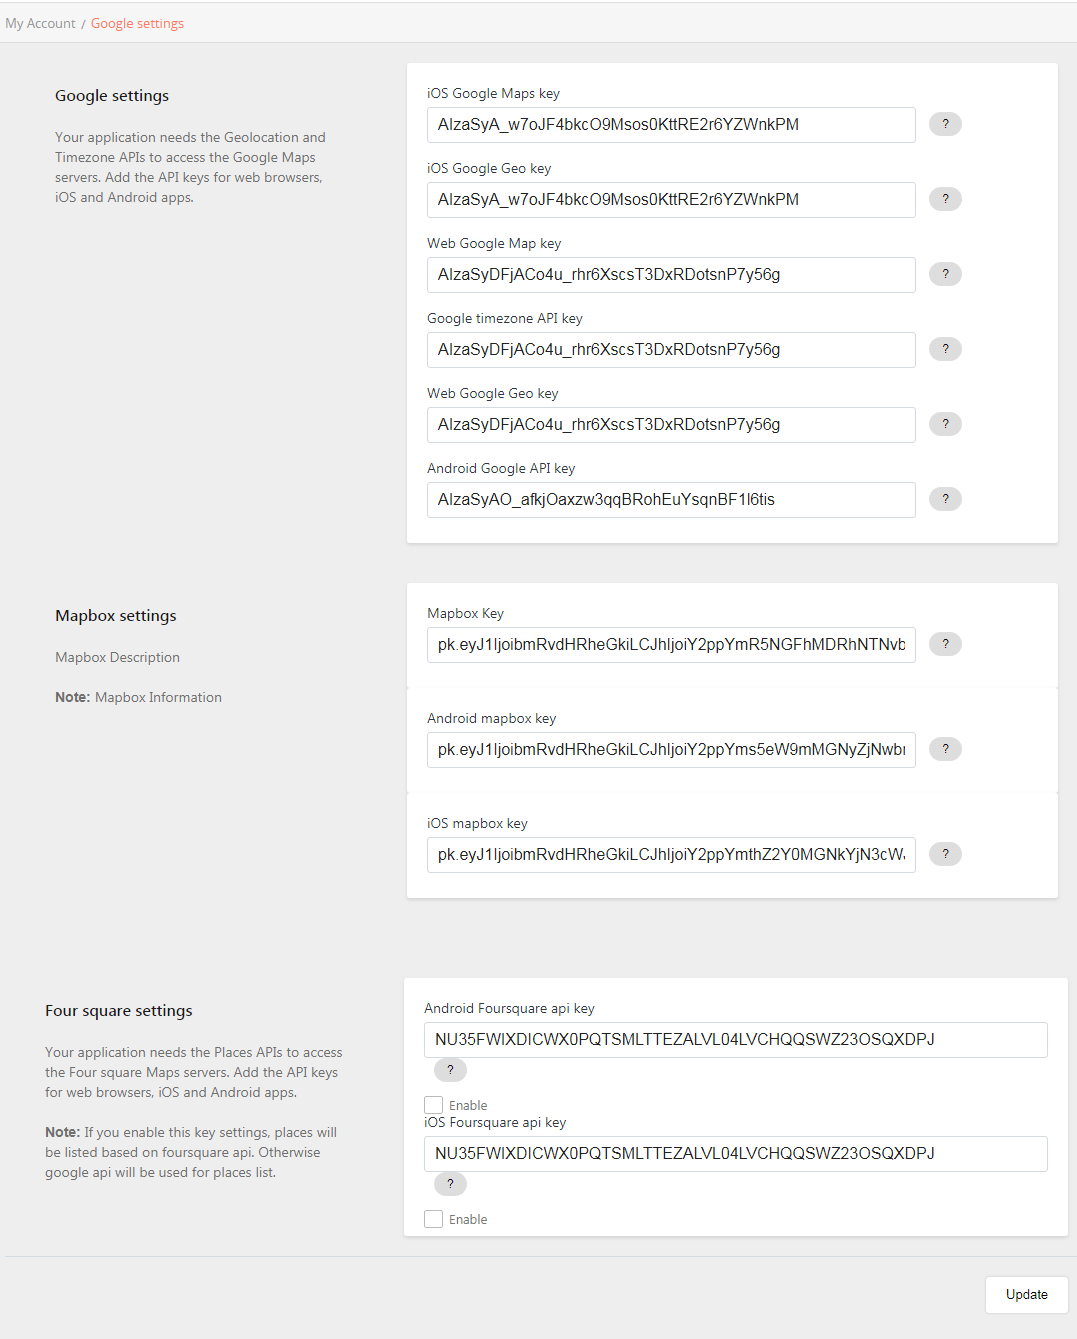
The admin can get here the API keys to access the Google Map, Mapbox, and Foursquare.
Get your contacts listed in the order of dates with the messages sent to each contact to easily manage and fast-track communication.
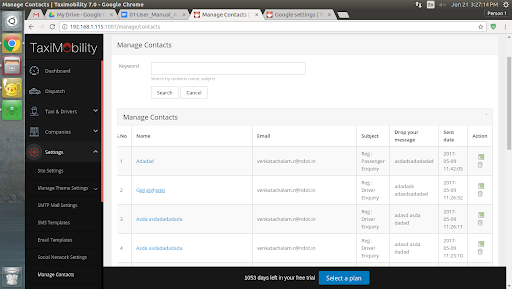
The “Action” button leads to a comprehensive view of each contact with elaborate details and also allows to remove any contact from the list.
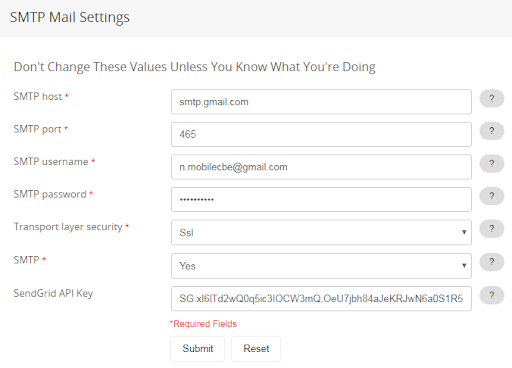
SMTP settings are simply your Outgoing Mail Server settings. Most of the email software are designed to use SMTP for communication through emails which works only with outgoing messages. Once you provide the SMTP setting details, the same can be set and integrated into the application designed for you. SendGrid is added for all email transactions. The key needs to be purchased with the license, and certain limitations apply to the free account.
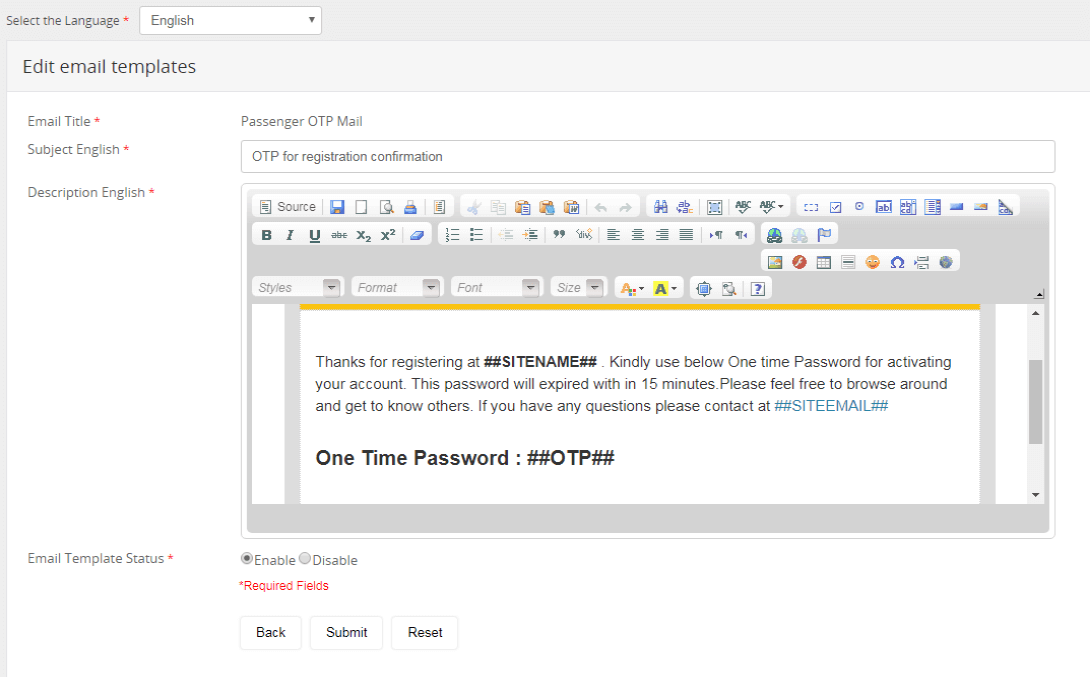
Select from a list of email templates, which can be customized for all languages individually.
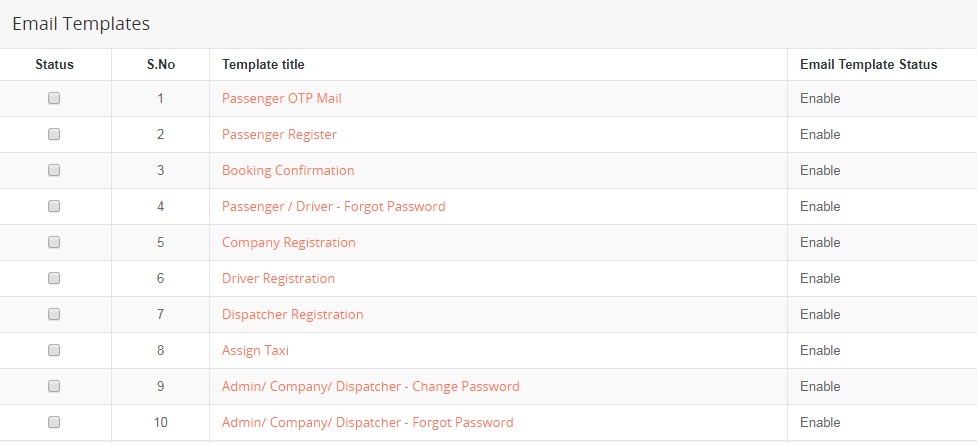
You can edit the templates by clicking on the title of the template.
SMS Settings allows Admin to update the credentials of Twilio SMS gateway.
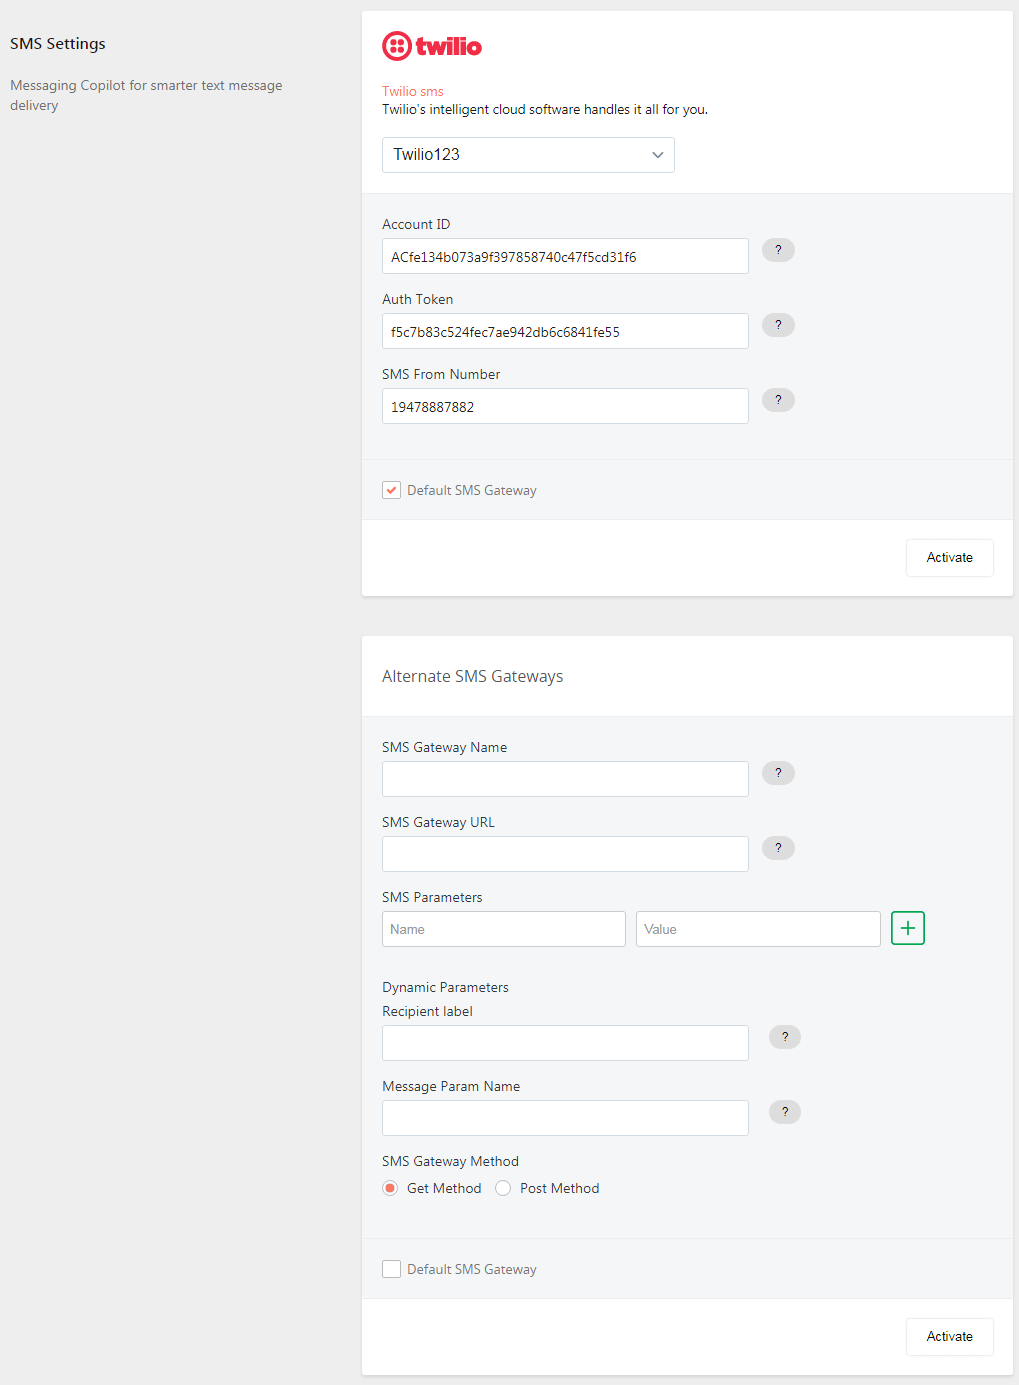
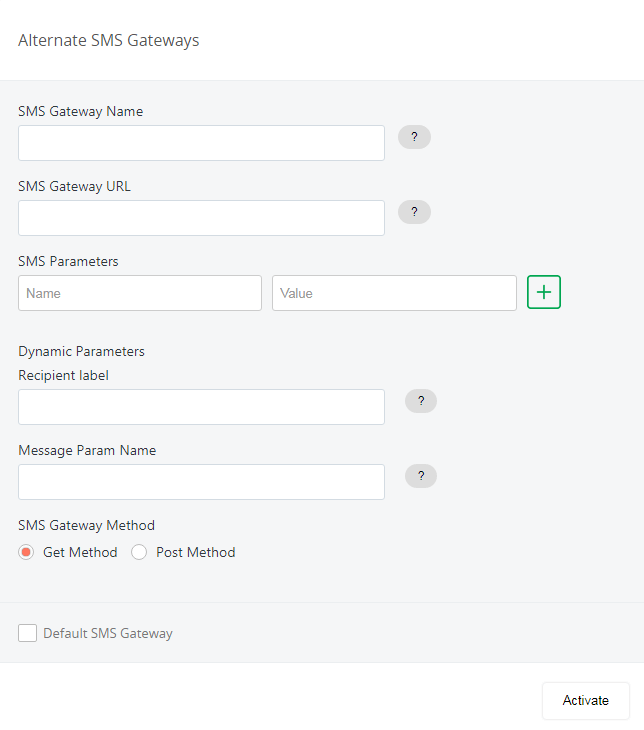
Dynamic SMS gateway solutions are also included with options to include the personalized recipient label and message parameter name.
A list of SMS templates is provided here for a fast and convenient communication system.
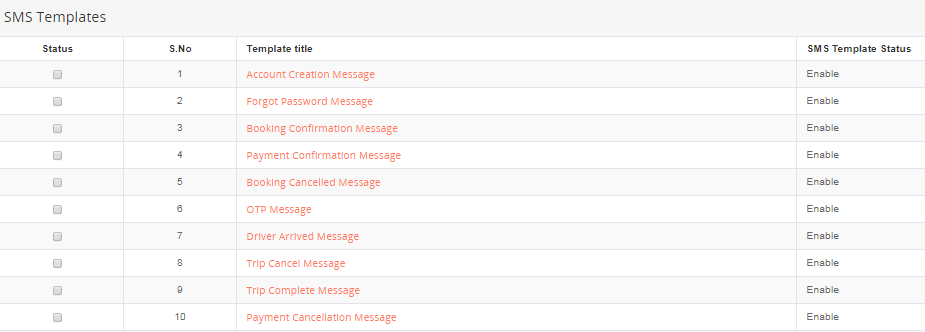
Click on the template title to make changes in the existing template.

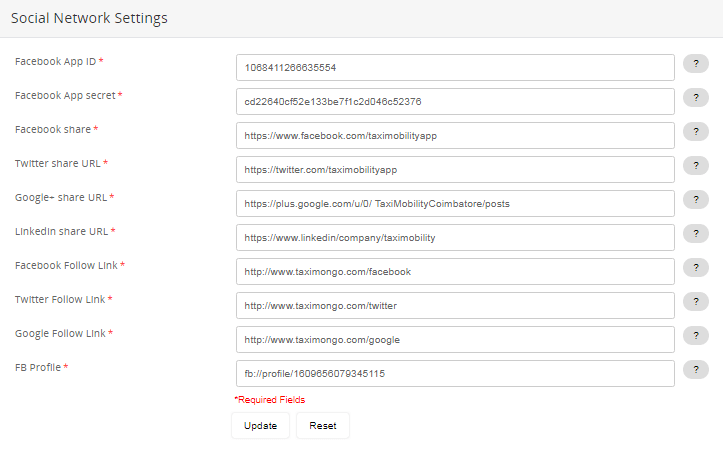
A social network is an online community, connected through Facebook, LinkedIn, and other social media. Social network settings enable to manage the links to different social media that are used to promote business or services.
Popular places of the city can be added here to show as the nearest popular places in the booking page of the passenger app. You can also edit the details by clicking on the “Edit” icon in the “Action” column.

To add a new popular place to the list, click on the “Add Dispatcher” button in the top-right corner.

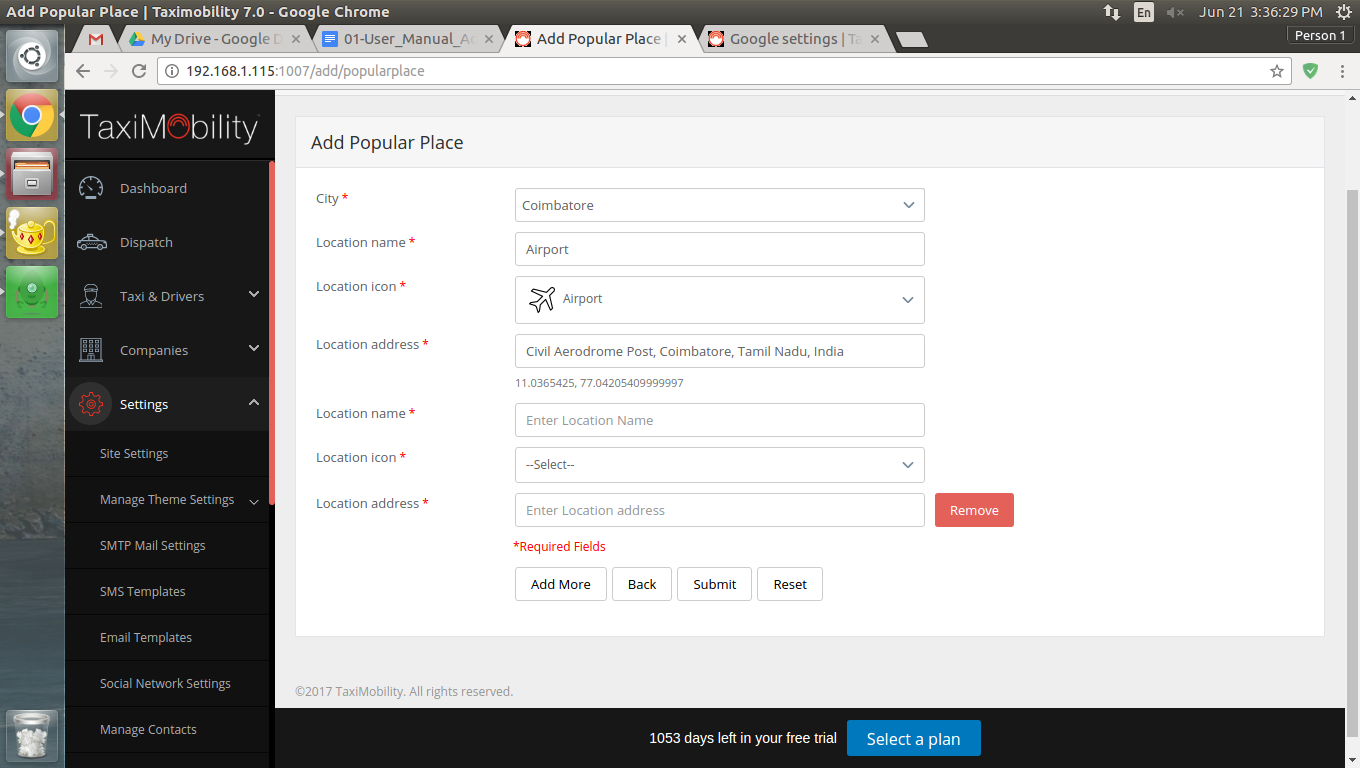
Provide the required details about the new place you want to add in the “Add Popular Place” form and click on the “Submit” button. The added place will be reflected in the list of popular places.
The content in both the front-end and back-end panels added, modified, or removed as required.
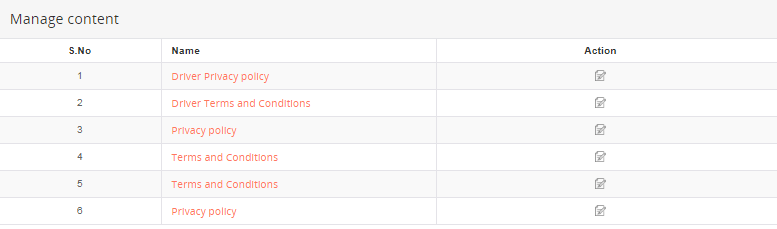
By clicking on the name of the content, you can view the content inside every topic.
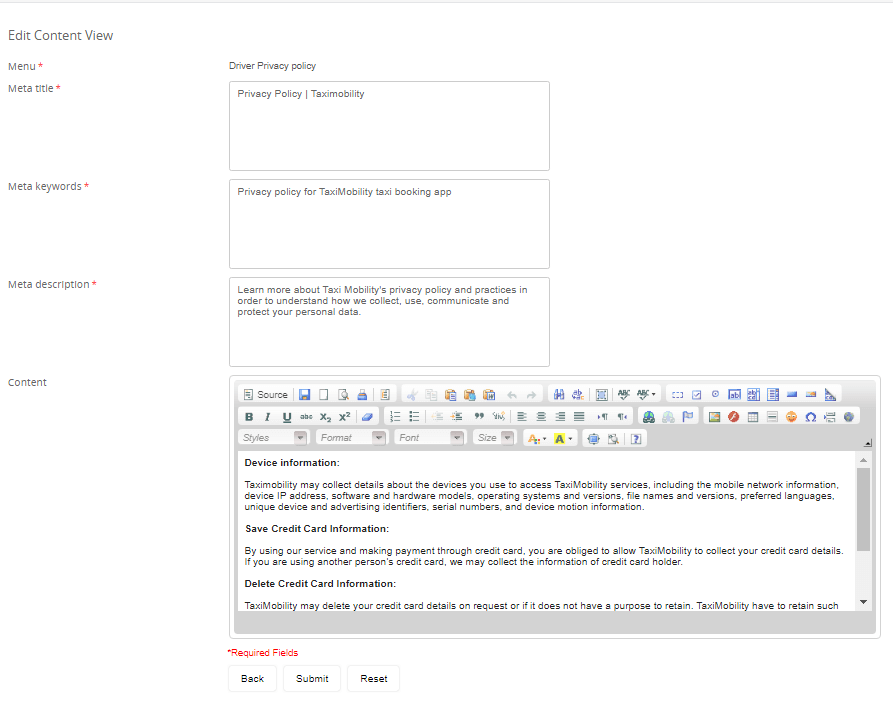
Content can also be edited by clicking on the “Edit” icon in the “Action” column. This option can be used to formulate contents furnishing details on the menu with meta title, keywords, and description.
This page displays the list of cities and its details including the fare percentage. If you want to change the default city, enable the city of your choice and click on the “Update” button in the bottom-right corner to save changes.
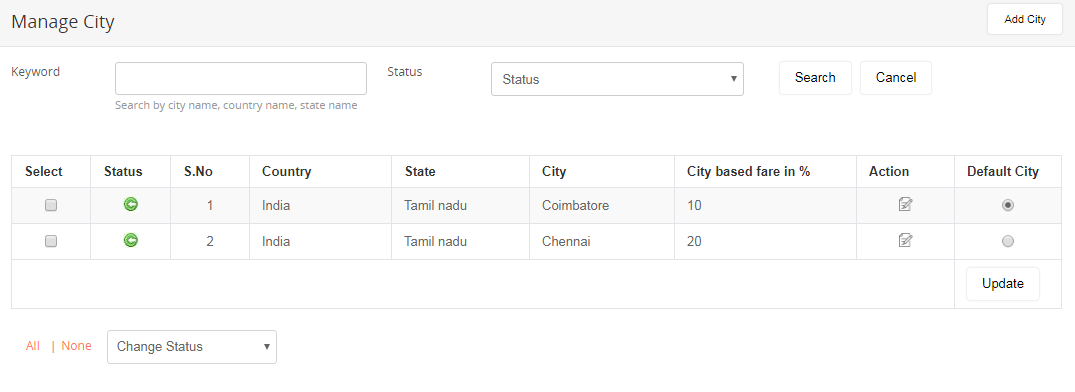
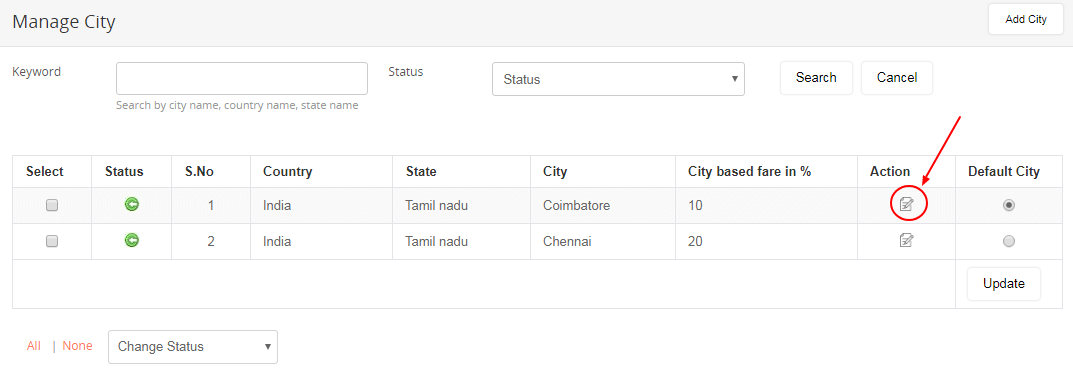
The city details can be edited by clicking on the “Edit” icon in the “Action” column.
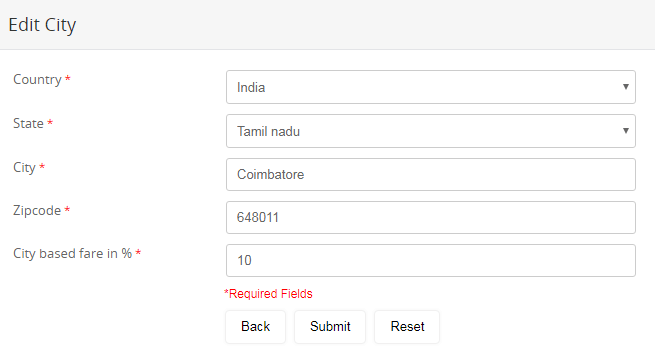
Update details that you want to change in the “Edit City” form and press the “Submit” button.
The admin can also add cities by clicking on the “Add City” button in the top-right corner.
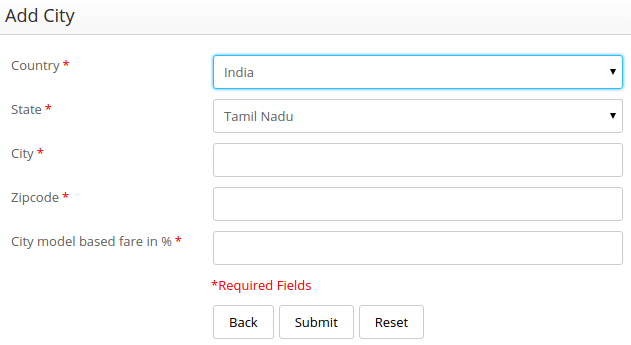
Add to the list the cities you wish to include with the name of the respective countries and states and set the fare (in %) for a trip for each region.
List and organize the state details.
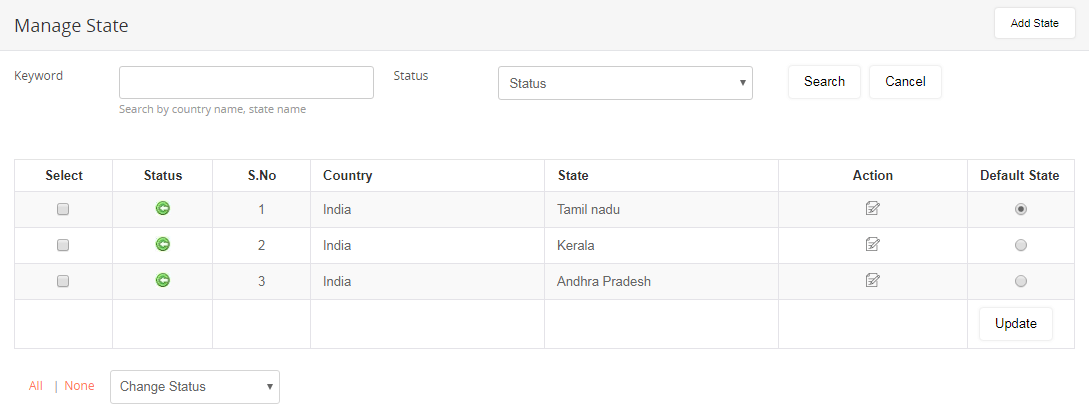
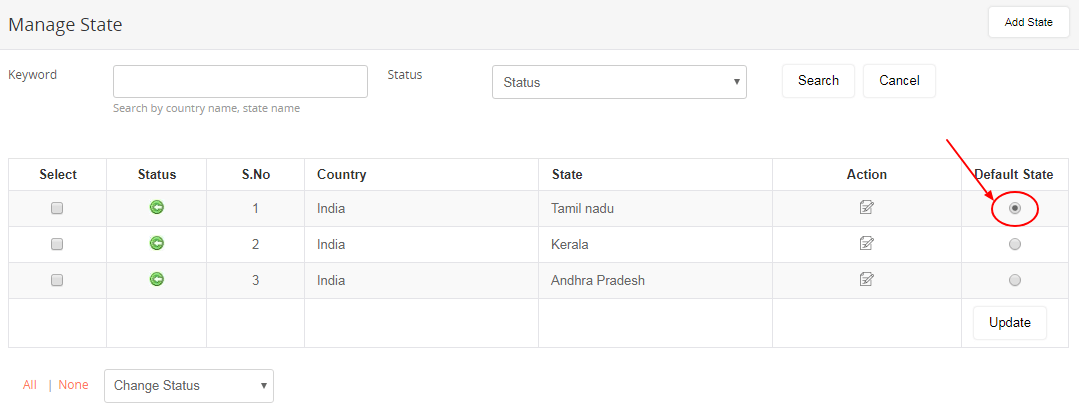
If you want to set any specific state as the default state, enable the state of your choice and click on the “Update” button in the bottom-right corner to save changes.
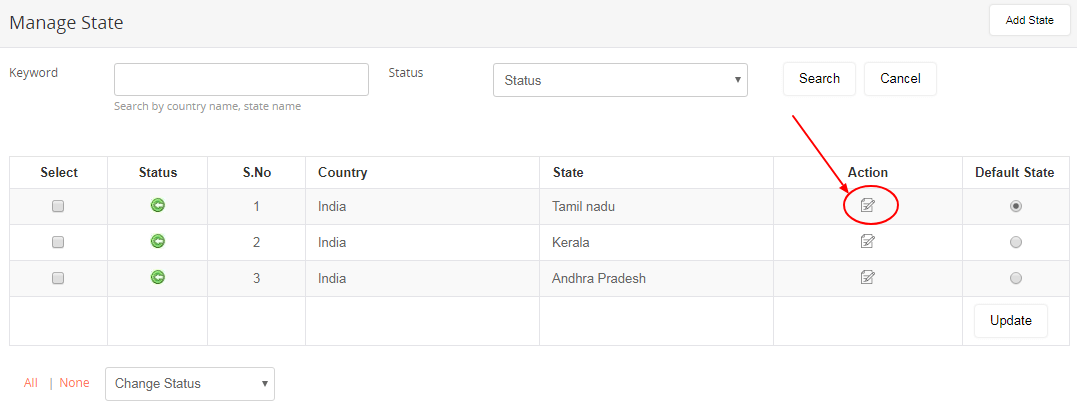
The admin can also edit the state details by clicking on the “Edit” icon in the “Action” column.
The admin can also add cities by clicking on the “Add City” button in the top-right corner.
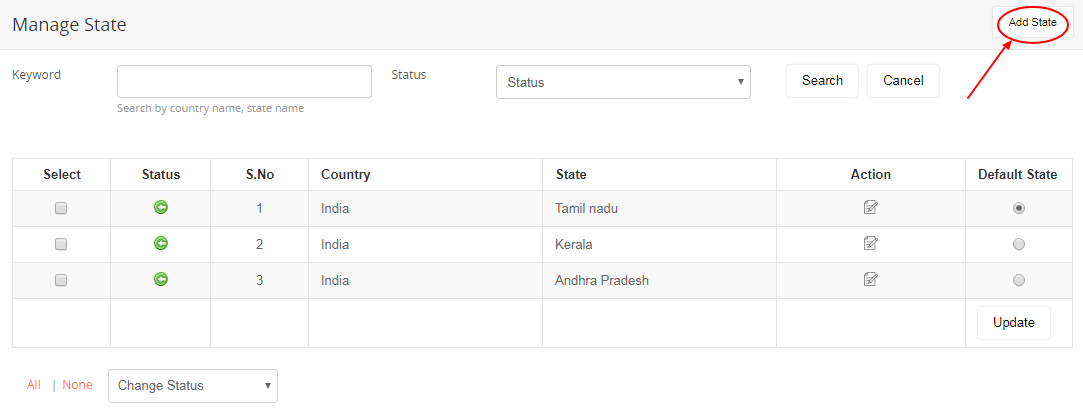
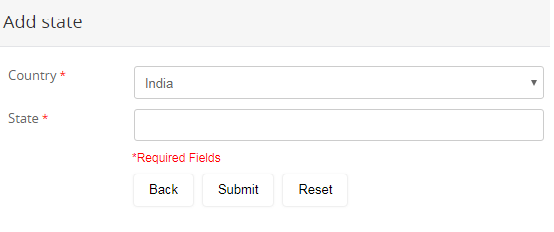
Add to the list the states you wish to include with the name of the respective country. The listed names can be edited as desired.
List and organize the details for each country.

The admin can also edit the state details by clicking on the “Edit” icon in the “Action” column.

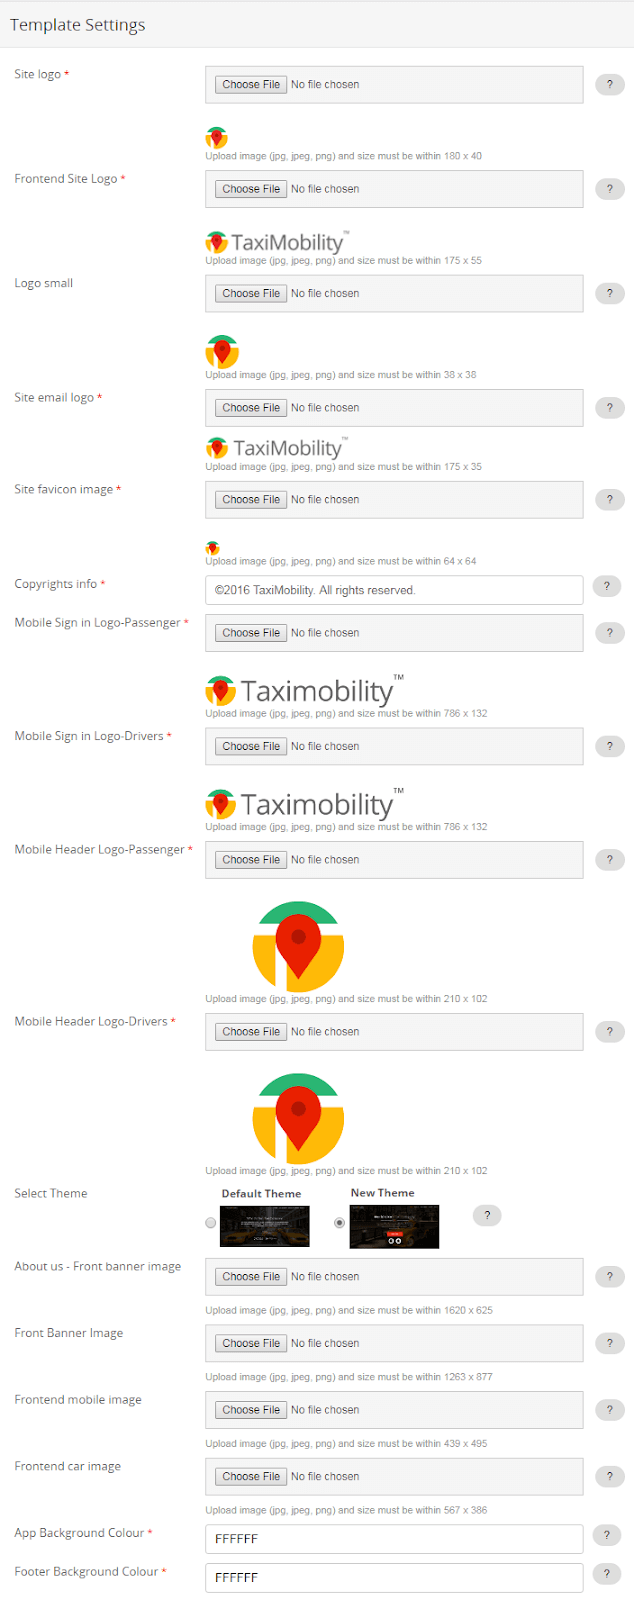
Template Settings is available to set the basic images (like logos, banner image, etc.) and themes of the web application at both the front end and back end. Two different front-end templates are available in the template settings.
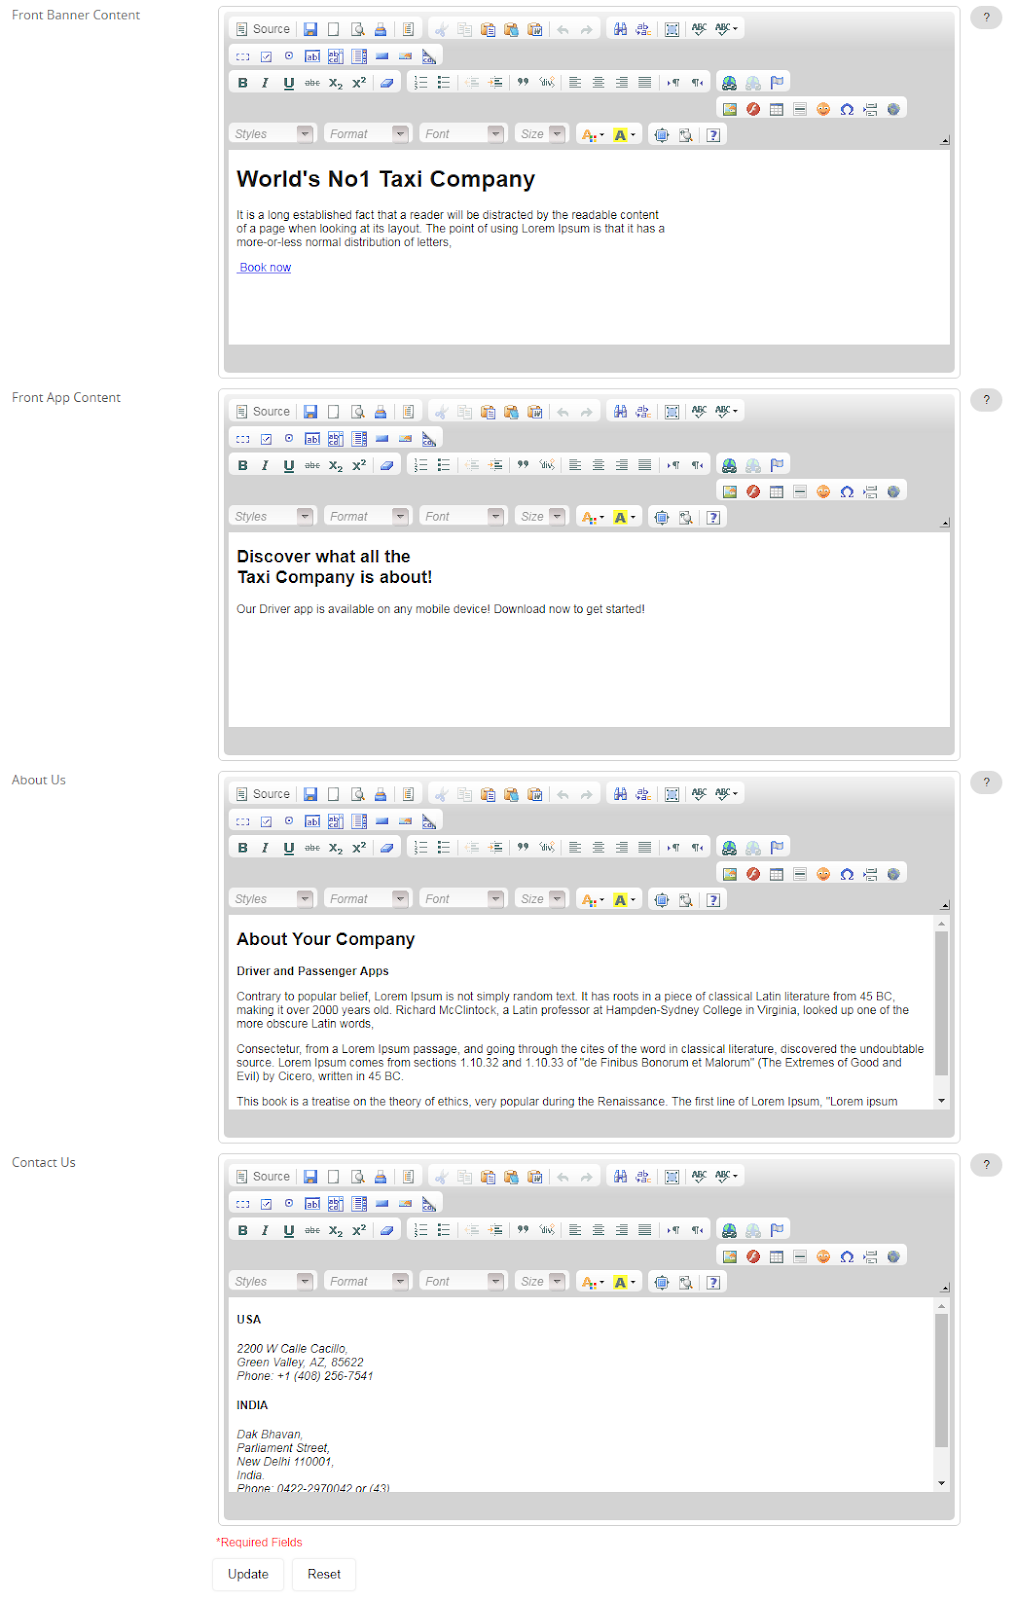
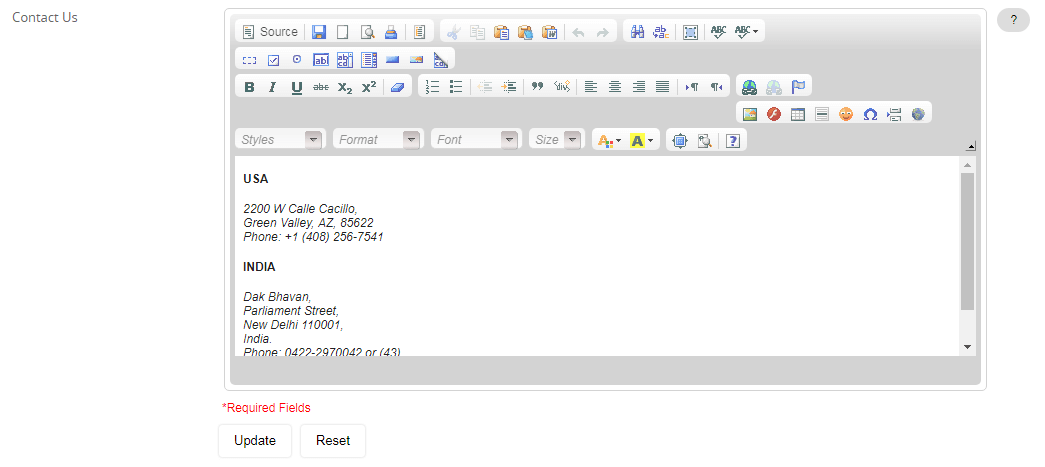
The admin can set the front banner and app content for each taxi company in the back end with the desired background color and image. In addition, the admin can include the content for the About us and Contact us page and set the background color for the same.
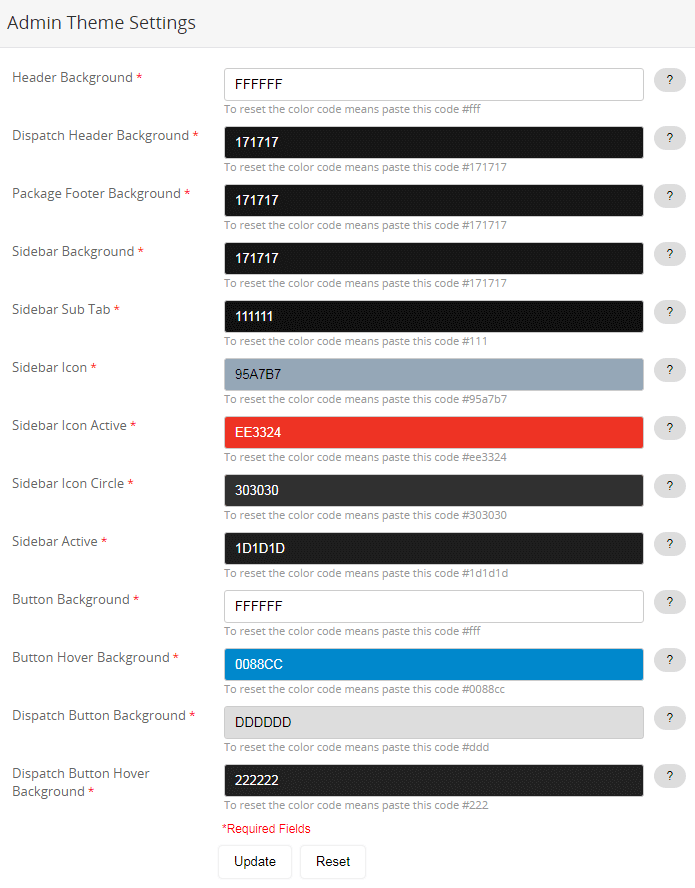
The colors and themes (Sidebar menu, header, menu icon,etc.) in the Admin panel can be customized as preferred.
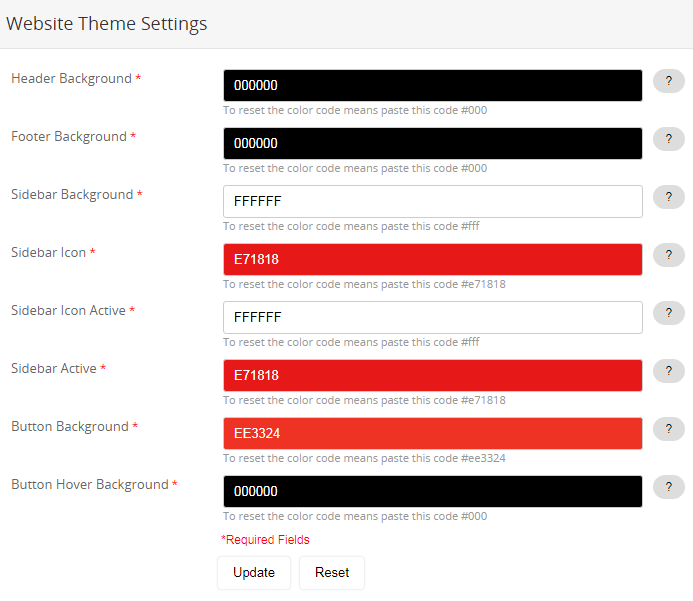
Admin can customize the colors of the front-end panel theme (Sidebar menu, header, menu icon,etc.). The changes will be reflected in all pages only once the passenger log in to the website.
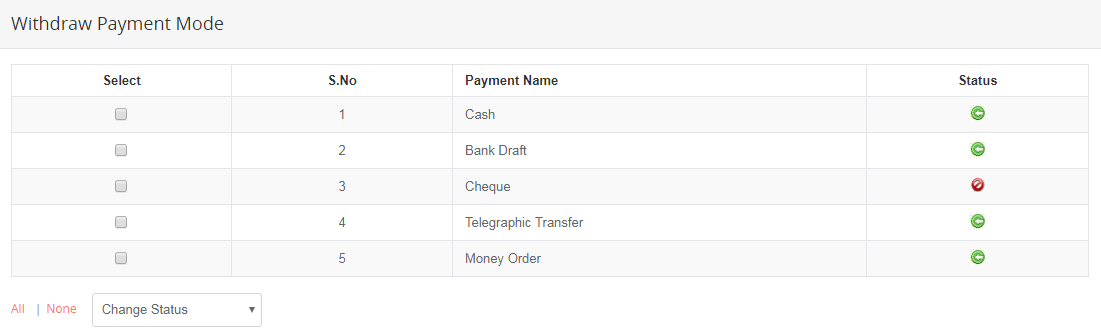
The mode of payment for the requests sent by the drivers to withdraw the amount from the wallet can be set in the back end. The status of any payment mode can be changed by selecting the particular option, click on the “Change status” drop-down menu, and change the status.
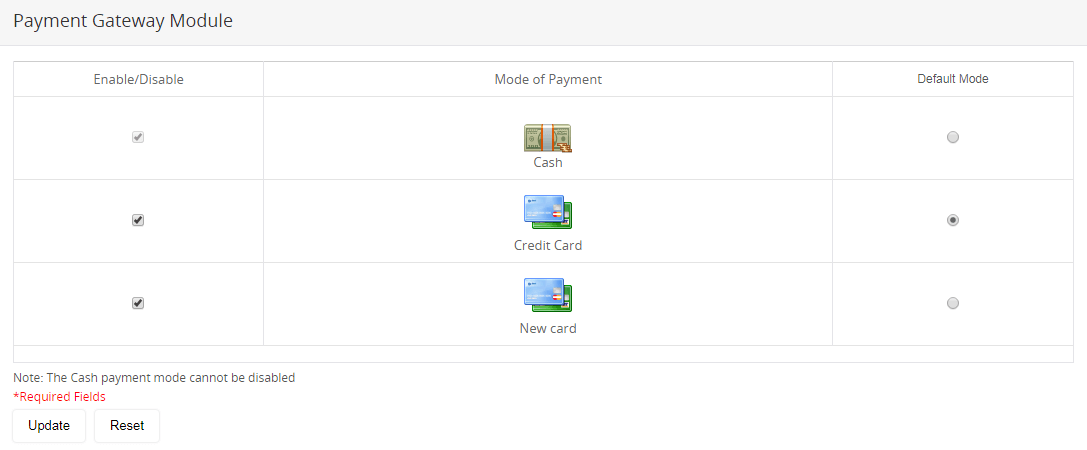
The mode of payment for the withdrawal requests sent by the drivers for the amount earned through referral programs can be set in the back end. The module provides you the alternatives to either enable or disable payment transactions by cash or card. The admin can also set the default payment gateway to be used by enabling it in the “Default Gateway” column.
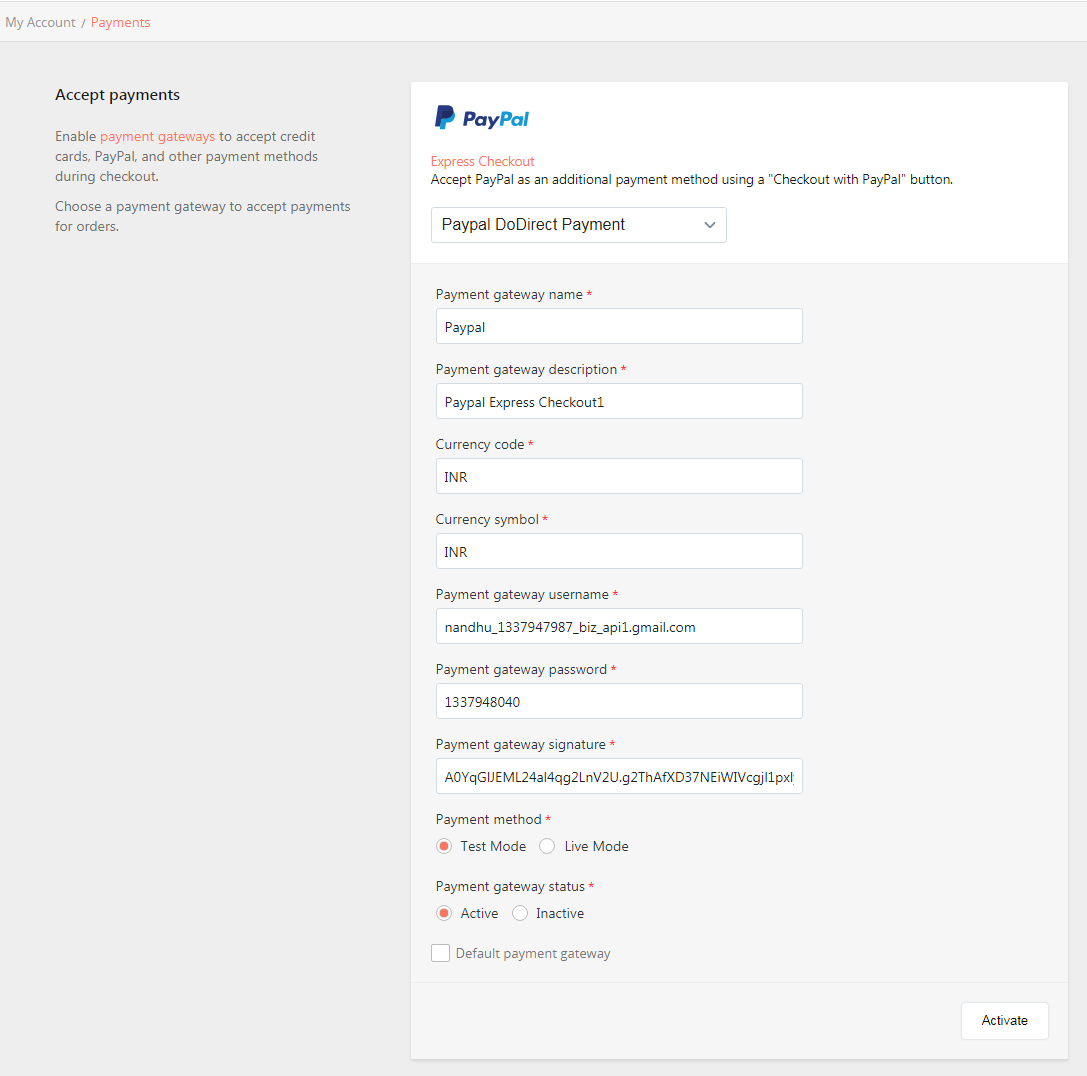
Set your PayPal API username and password, currency code, and symbol through payment gateway settings.
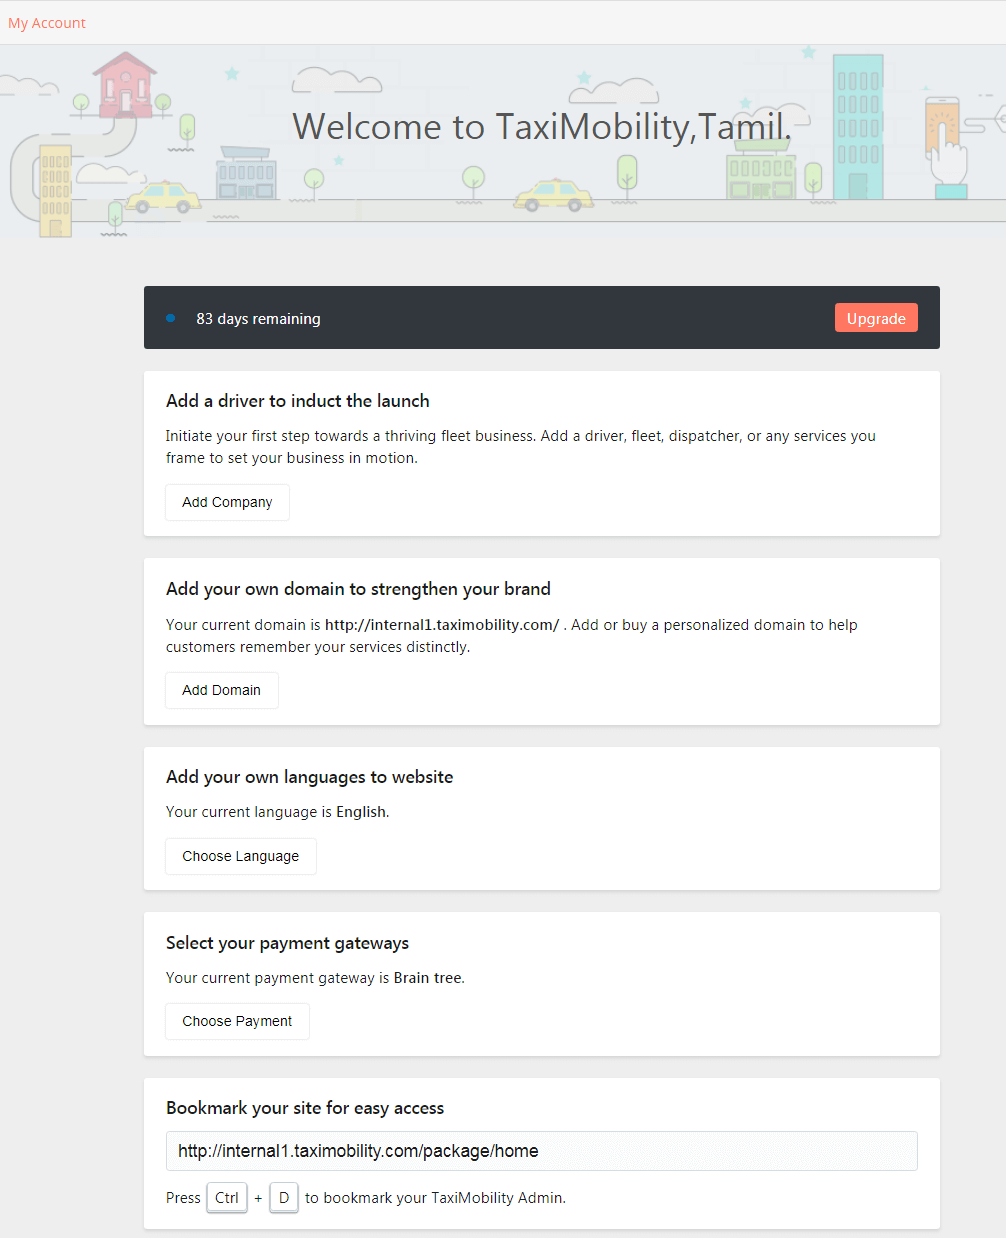
The home page shows the current plan details of your account and available features of the application. The user can also add company and domain, choose website language, and select payment gateways right from the home page. If you want to upgrade your plan, you can do so by clicking on the “Upgrade” button in the top-right corner.
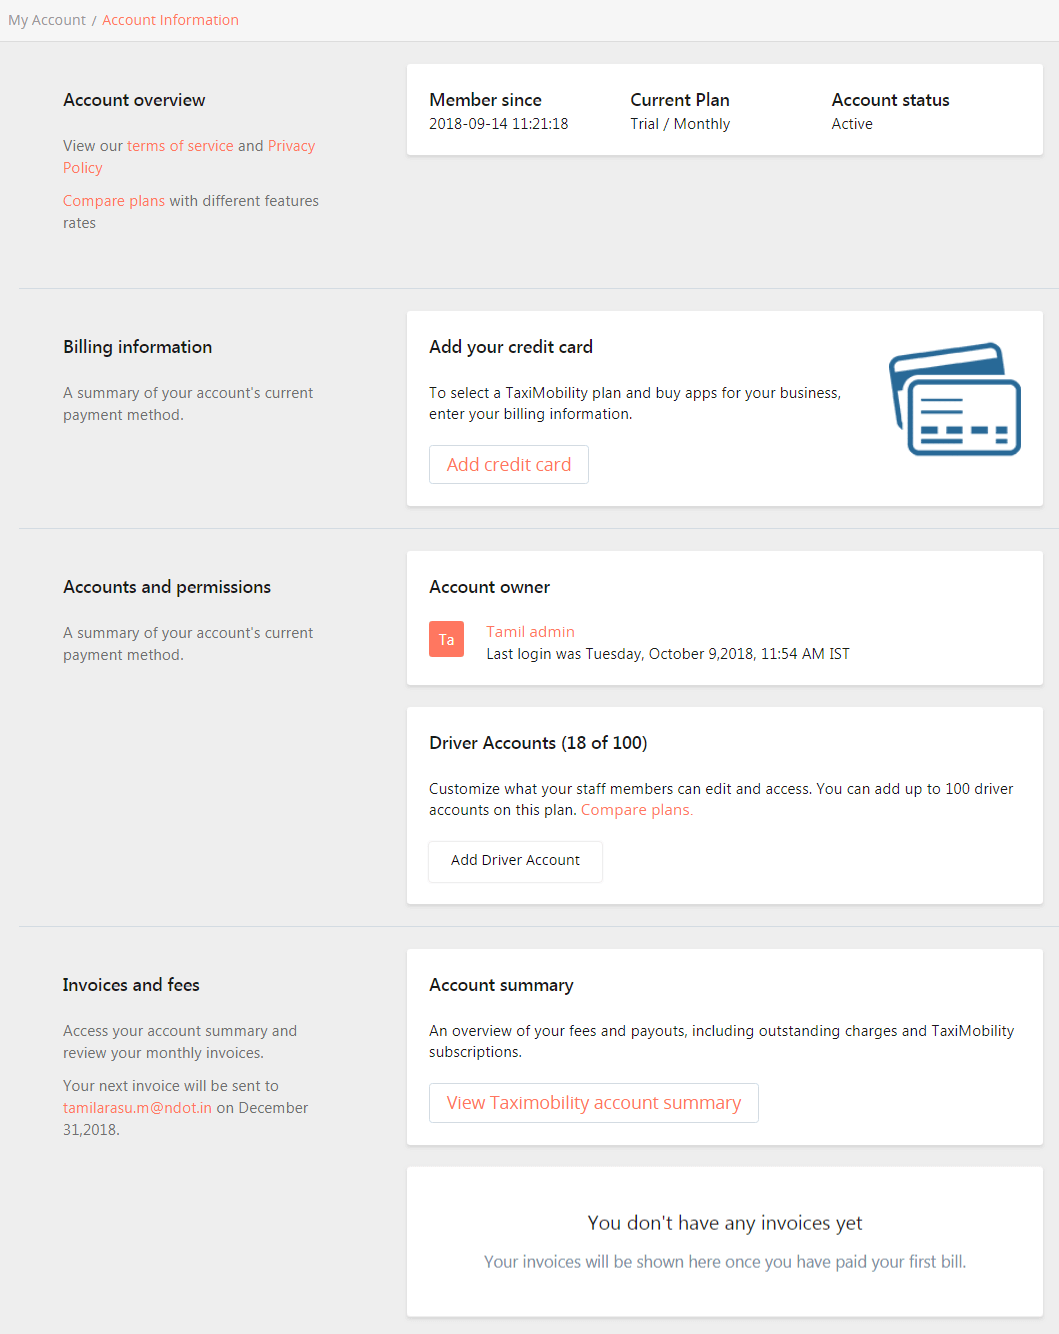
The account page shows the account summary, billing information, permissions, and invoice details.
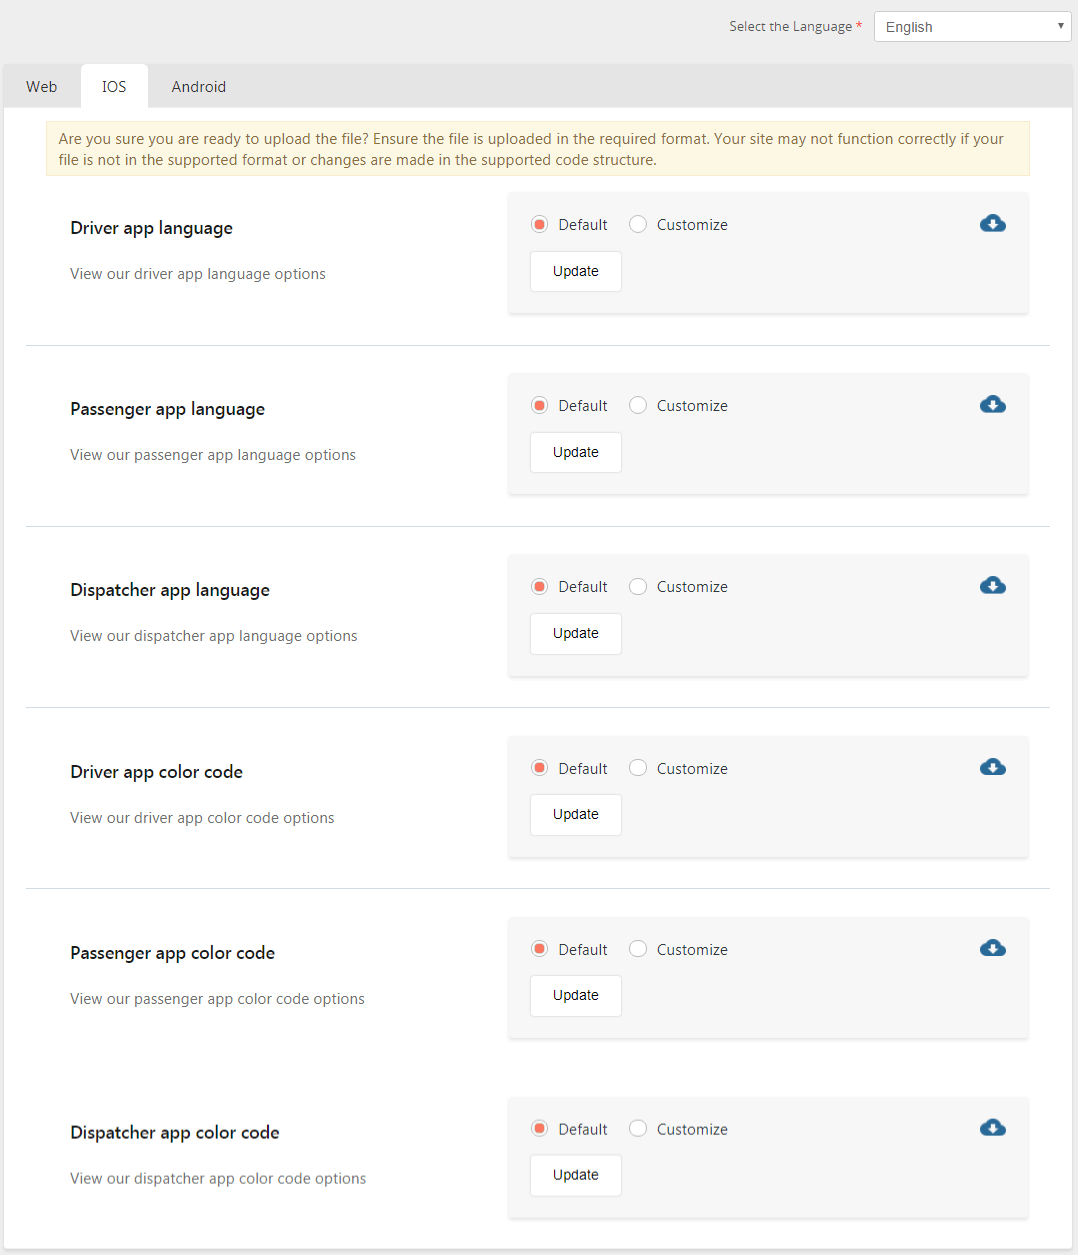
Language files of the web and mobile apps and the color codes of mobile apps (passenger and driver) can be customized here.
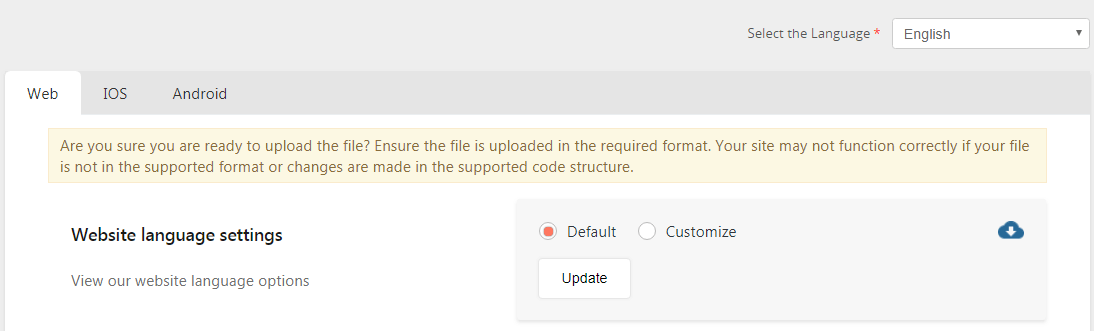
These settings can be modified for iOS and Android individually.
You can connect your existing domain with the system.
