Request a demo
Tell us about yourself, and we'll be in touch right away.

The fleet tracking dashboard presents the statistics on fleets, fleet availability, idle running time, driver unavailability, and bookings using graphs and vehicle heatmap. The “Total Kilometers” option describes the total distance traveled by fleets during rides including the empty kilometers. The “Empty Kilometers” option describes the distance traveled empty to pick up a passenger and also without any ride.
![]()
The fleet availability graph indicates the count of vehicles that were available but did not receive any rides for the month. The filter option can be used to select the desired date range.
![]()
The number of drivers who were available but did not accept any passenger request for the day are represented through the graph below.
![]()
It displays the graphical representation of the number of drivers who drive under different package plans opted by admin.
![]()
The vehicle heatmap visualizes the position of vehicles in a location, indicating the fleet availability in each area.
![]()
The admin can have the complete details of the companies here with the number of vehicles, drivers, and dispatchers. By clicking on the company name, you can access the report of the particular company. You can also add vehicles, drivers, and dispatchers directly by clicking on the “Add Fleet”, “Add Driver”, and “Add Dispatcher” in the respective columns, respectively. You can edit the company details by clicking on the “Edit” button in the “Action” column and can access the transaction details by pressing the “Transaction” button in the same column.
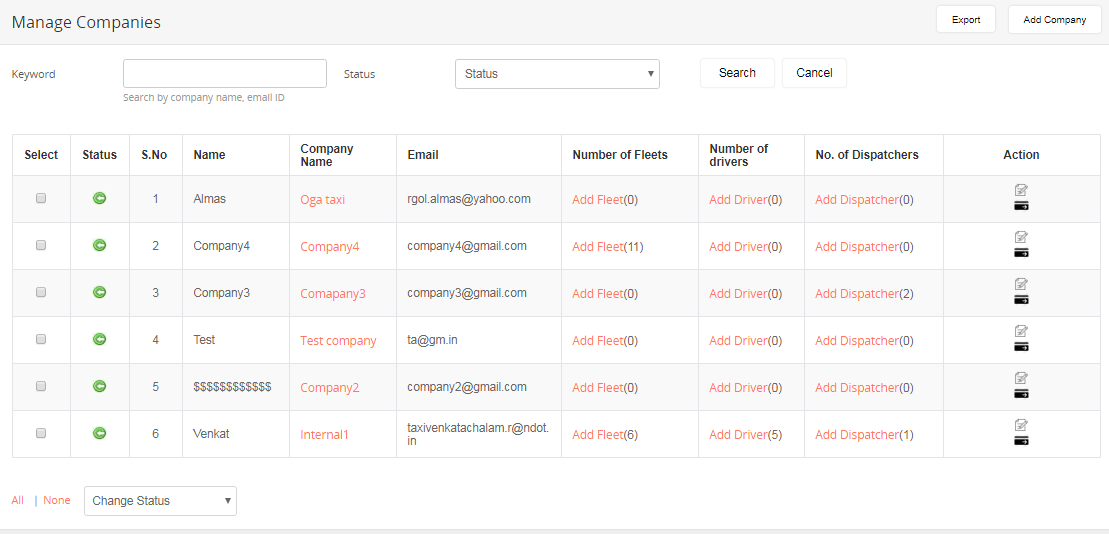
Click on the “Add Company” button in the top-right corner to add more companies

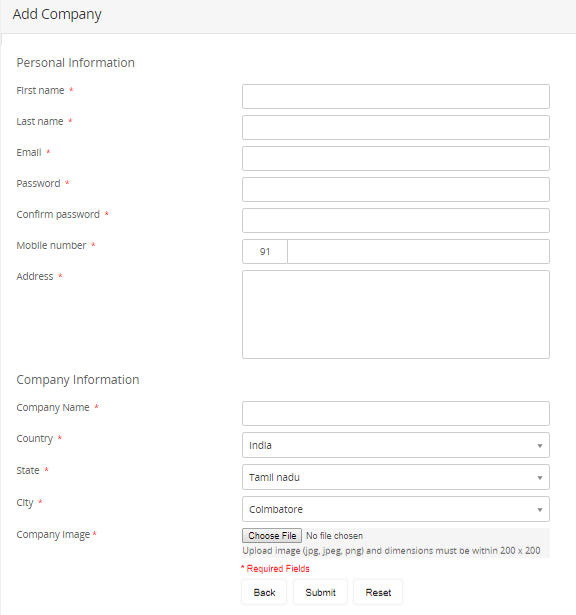
To add a new company, you have to fill up the form with all the required details such as owner name, email ID, mobile number, address, and company information with location details and image. Once you are done with the form, press the “Submit” button.
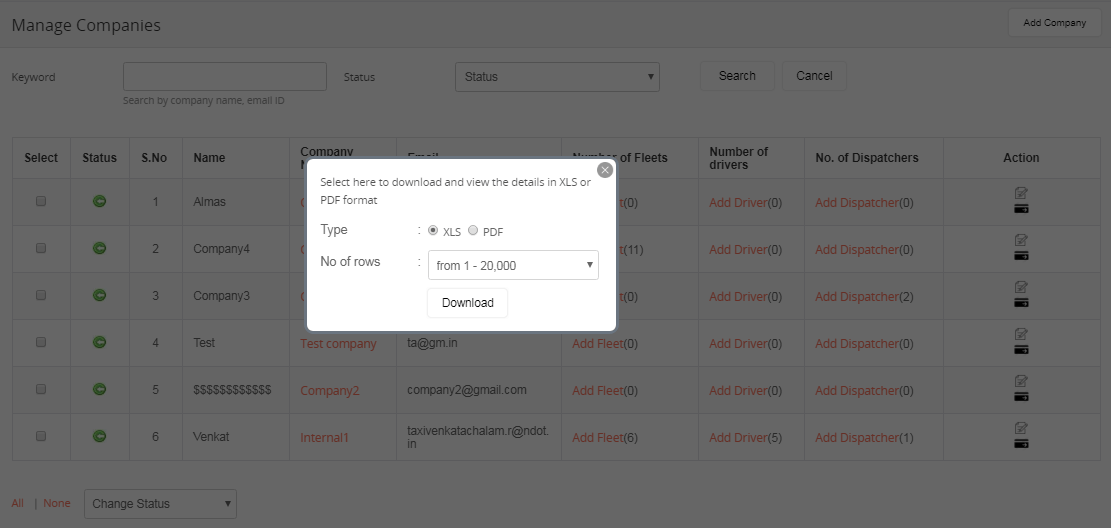
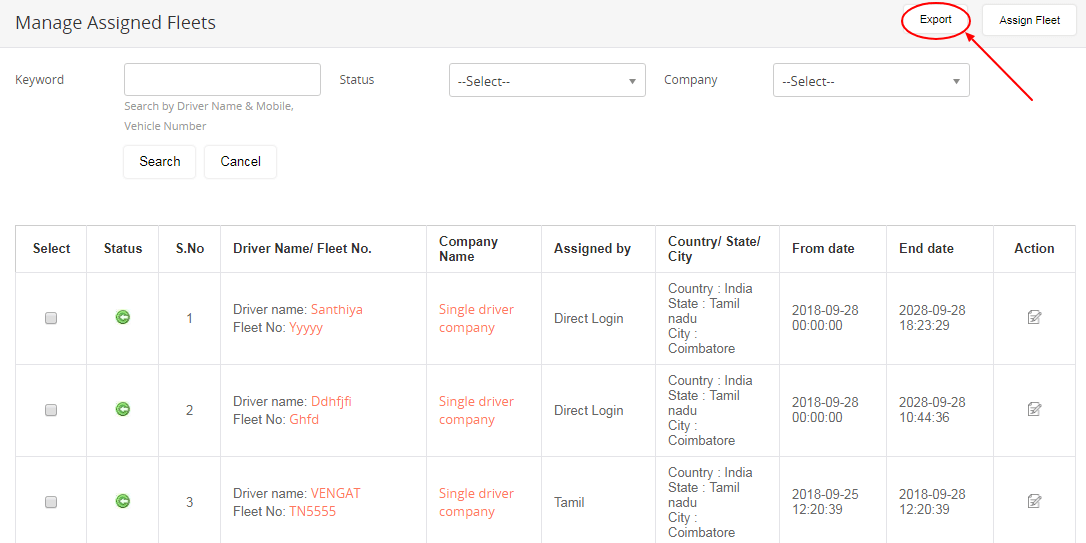
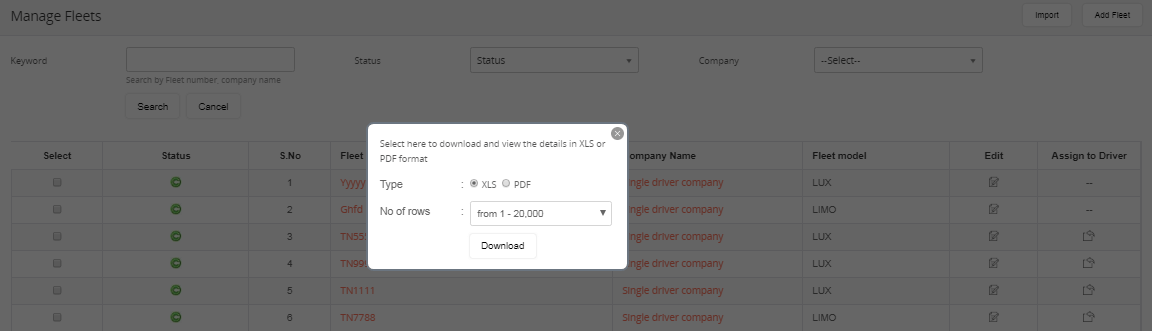
The report can be downloaded in XLS or PDF format by clicking on the “Export” button on the top-right corner.
This functionality allows categorizing the vehicle types by their brands for easy operations. The “Edit” button in the “Action” column allows to edit and set a more elaborate record of each vehicle.
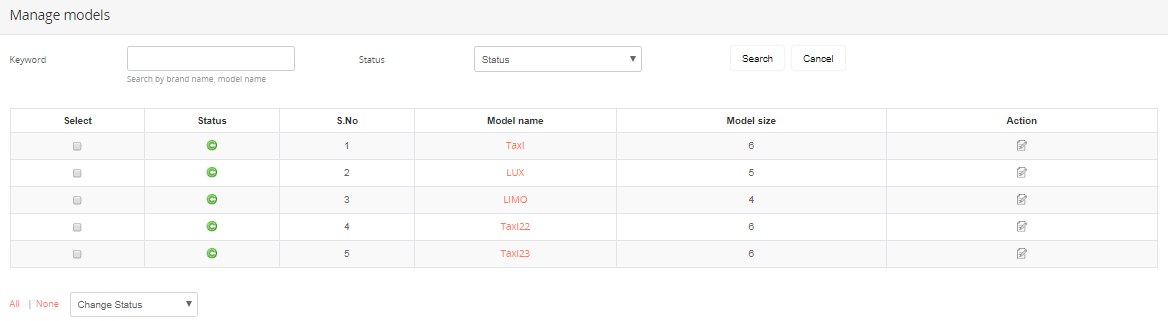
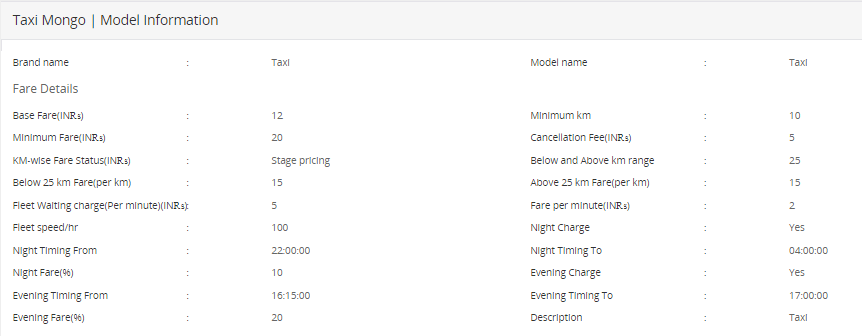
The vehicle name, model size, and fare details can be tabulated here.
If the fare is calculated by distance, a base fare is set for a fixed distance for each vehicle model. Any ride within that distance will be charged only the base fare. From that point, minimum miles and a minimum fare are fixed, and any ride that is completed within the minimum miles is charged with the below miles fare (in addition to the minimum fare and the base fare). Any ride that exceeds the minimum miles is charged with the above miles fare (in addition to the minimum fare and the base fare). A cancellation fee can be set for all rides that are canceled.
The fare can also be calculated per km/mile instead of below km/miles and above km/miles fare. A minimum fare is set for a fixed distance and every additional km/mile is charged with the set per km/mile fare. This option can be enabled or disabled as per preference.
If the fare is calculated by time, the fare is set for a minute and is calculated by the time (in minutes) taken to complete the ride. The speed per hour of a fleet is fixed for a vehicle, below which the waiting charges will apply. Separate charges for night and evening rides can be recorded, if preferred.
The images of vehicles can also be included in the profile separately for Android and iOS devices.
Minimum KM – This is the minimum kilometer range set for short trips
Minimum fare – This is the fare for the distance traveled below the Minimum KM. The minimum amount can be increased or decreased as required. This fare is applicable when a passenger takes up ride for a short distance which is below the Minimum KM.
Base fare – The basic service charge is applicable for all rides that cover a distance above the Minimum KM.
Below KM and Above KM range –This acts as a divider in calculating the KM fare. Assume the value is 10 KM.
Below KM fare - This is applicable when the distance covered is below 10 KM (for instance, if the distance is 8 KM).
Above KM fare – This is applicable when the distance covered is above 10 KM (for instance, if the distance is 18 KM).
KM-wise fare – The fare is calculated based on the distance. A minimum fare is set for a fixed distance and every additional km/mile is charged with the per km/mile fare.
Tax – The tax percentage will be included in the total ride fare.
Cancellation fee - This is charged when a passenger cancels the trip.
Waiting fee - Waiting charges are applied when the vehicle is put on waiting or when the vehicle runs below the minimum fleet speed.
Night fare - This fare is set in percentage for the rides booked during nights. The amount is included in the total ride fare. The time range can be set by the admin.
Evening fare - The admin can set the evening fare for rides in percentage. This is added to the total ride fare.
City-based fare (%) - The city-based fare (%) is defined in Manage City, and the amount is added along with the Distance, Night, and Evening Fare.
By clicking on the model name, you can get the complete details of the model.

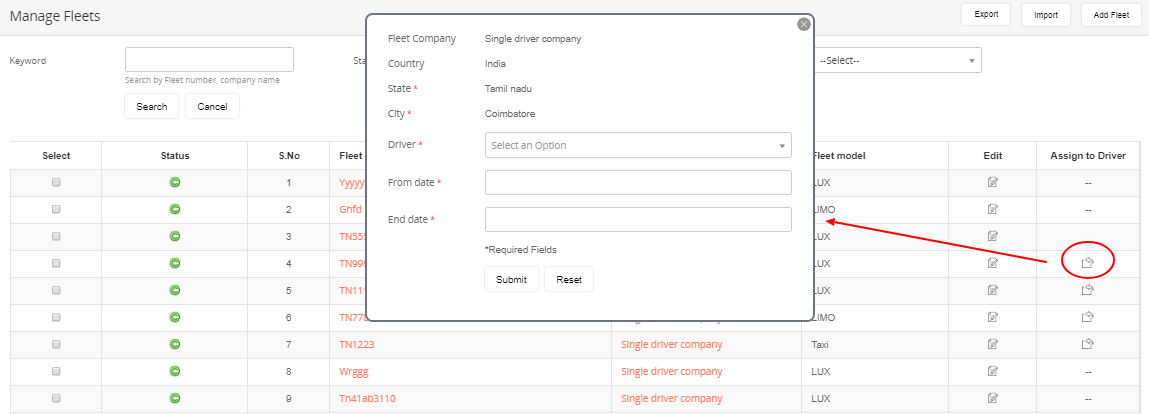
It is listing out the vehicles with detailed information including the vehicle number, the owner companies, vehicle types, and models. Use the keyword search to locate the data on any vehicle more conveniently.

The admin can add more vehicles by clicking on the “Add Fleet” icon.

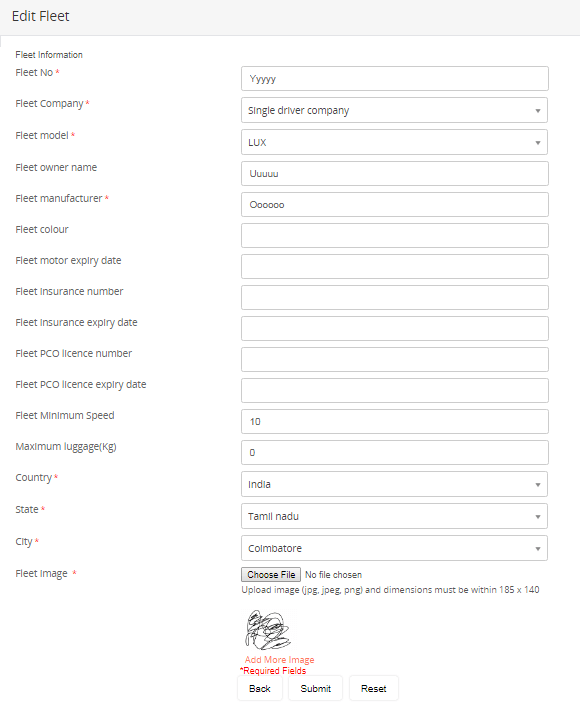
Any particulars of a vehicle such as the fleet number, minimum speed of the fleet, fleet speed/hr, model name, owner name, manufacturer, color, insurance details, license details, and the load capacity of each vehicle can be included here. The images of vehicles can also be included in the profile.
The admin can also assign fleets to drivers here. The available drivers will be listed in the drop-down for the admin to select from and assign the selected vehicle to that particular driver.
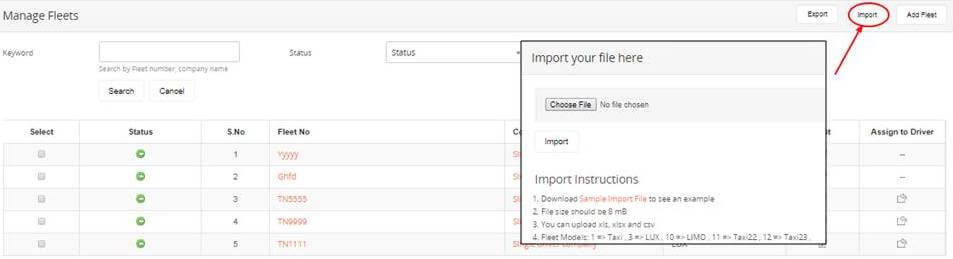
The admin can import files to the database. While importing, the admin will be notified of any errors such as invalid taxi number, invalid company email, and so on.
The report can be downloaded in XLS or PDF format by clicking on the “Export” button on the top-right corner.
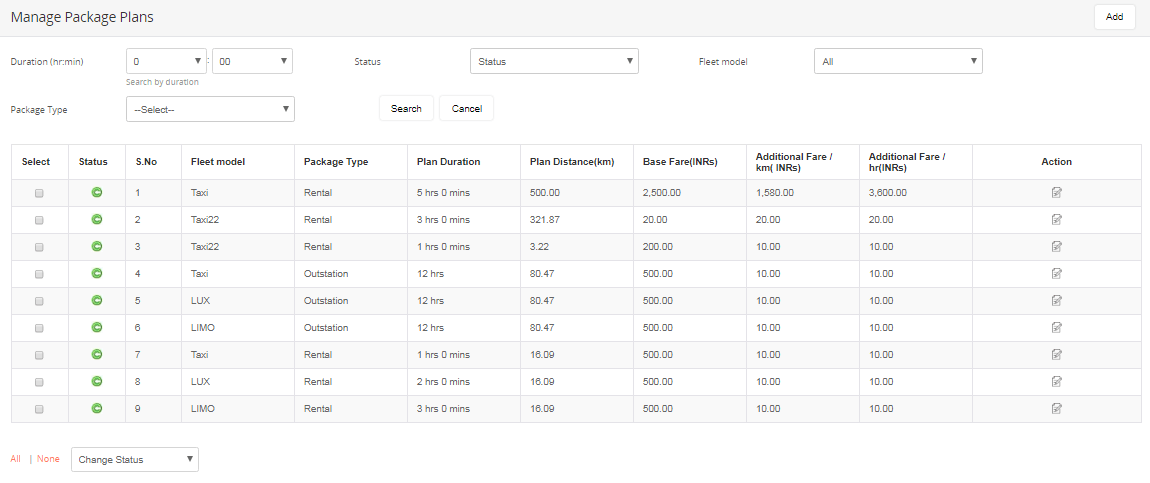
The passengers can be rolled out with two ride packages that are Rental and Outstation.
The admin can add more package plans with varied options by clicking on the “Add” button in the top-right corner.
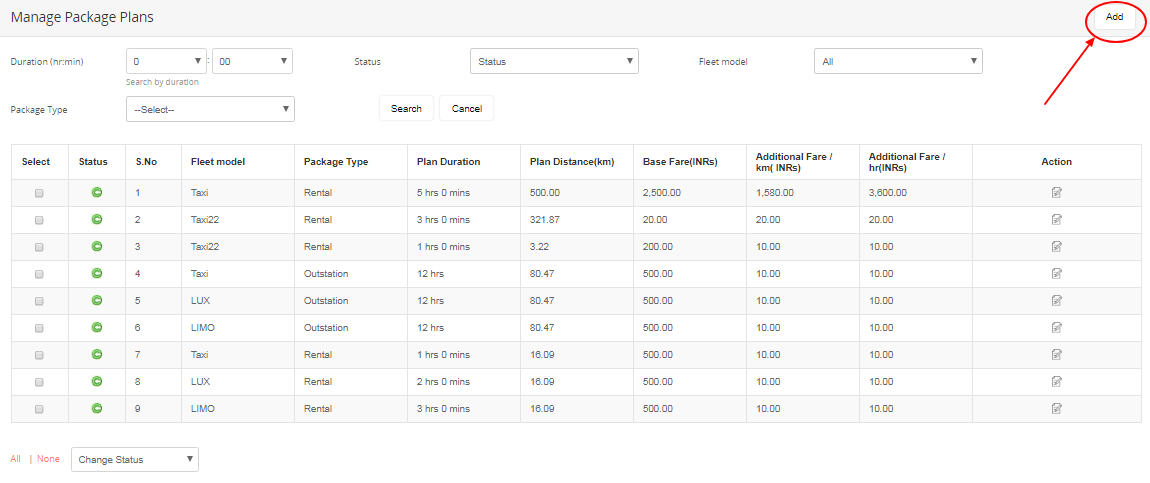

To add a new package plan, you have to select the package type. Then, fill up all the required fields with appropriate information. Finally, click on the “Submit” button.
If you want to edit any particular package plan, you can do so by clicking on the “Edit” button in the “Action” column.

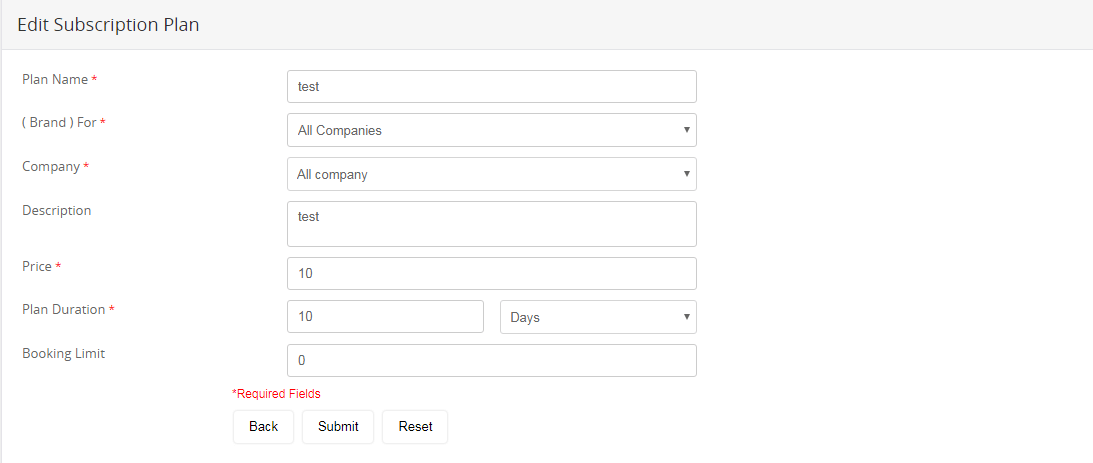
Make necessary changes in the “Edit Subscription Plan” form and press the “Submit” button.
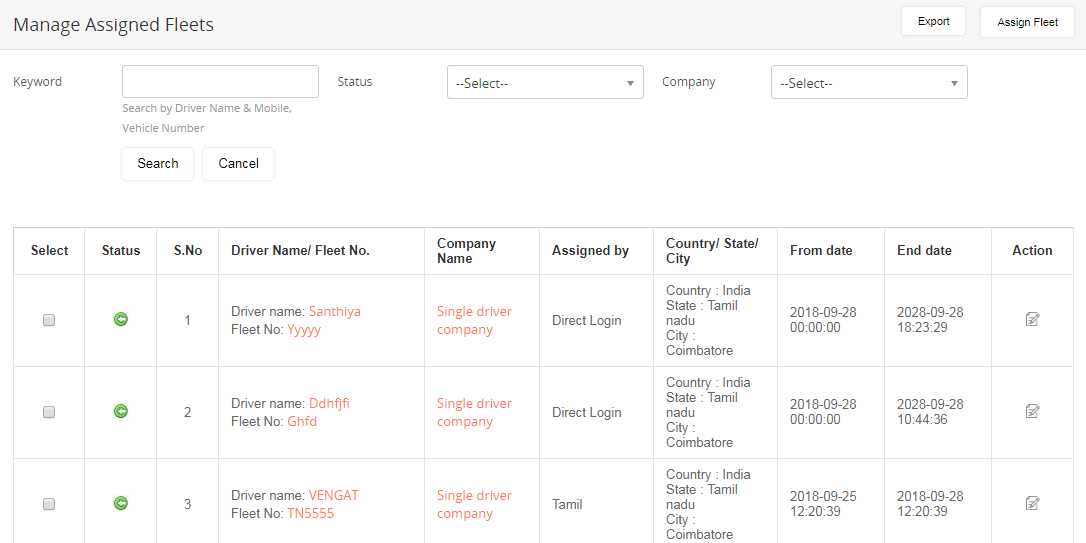
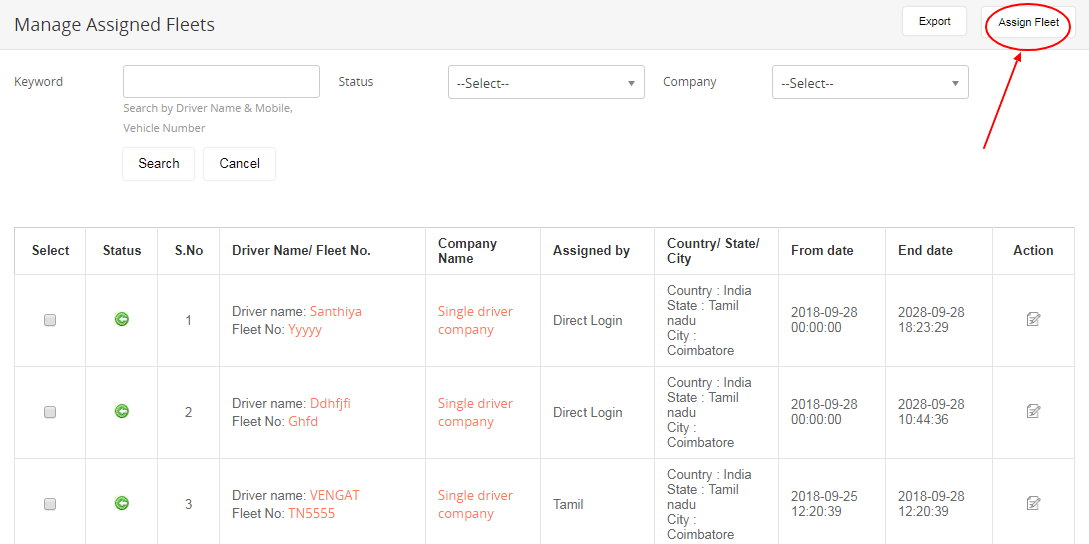
The vehicles assigned to drivers are listed here. The admin can set the number of days/hours a vehicle is being assigned to a particular driver, and can also modify or extend the days by clicking on the “Edit” button in the “Action” column.
Vehicles can also be assigned manually to drivers by selecting from the list of vehicles and providing the required information.
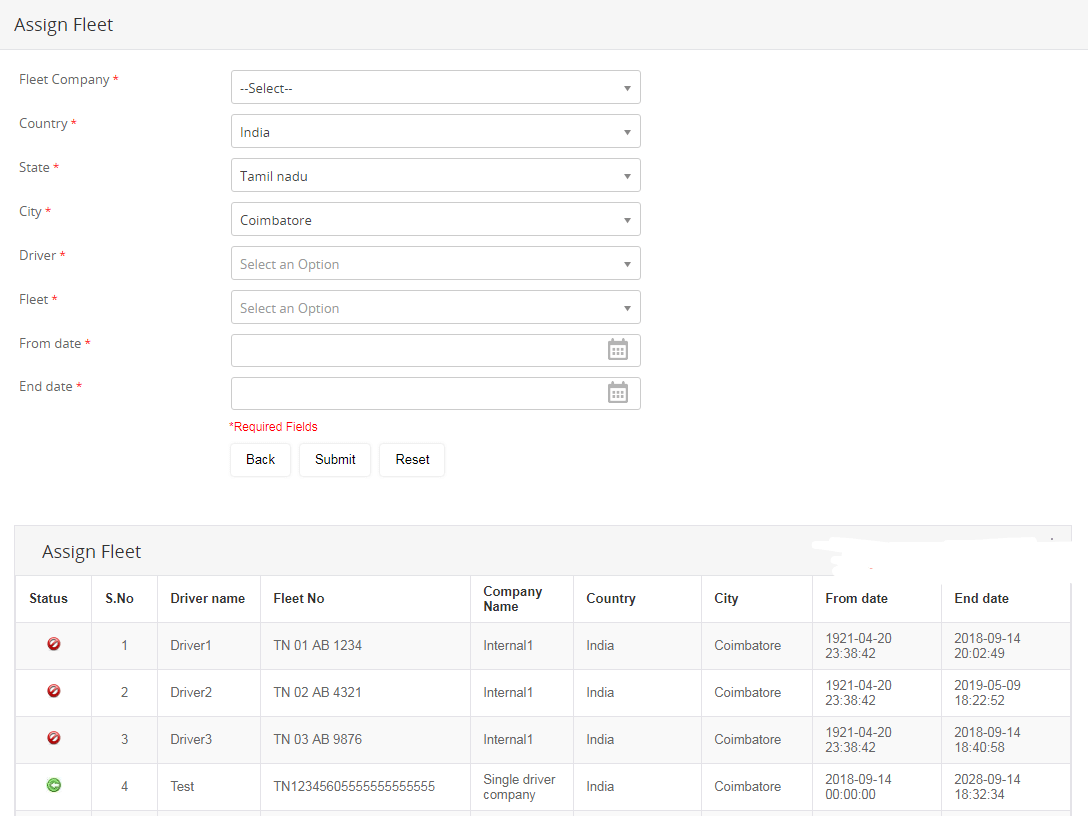
Update the required fields with relevant data and click on the “Submit” button.
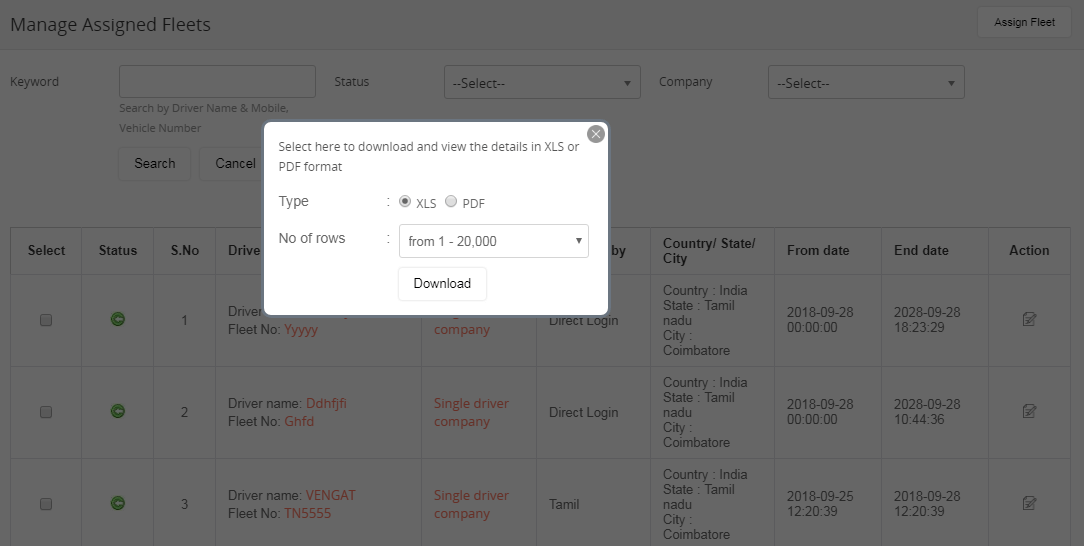
The report can be downloaded in XLS or PDF format by clicking on the “Export” button on the top-right corner.
The details of each taxi dispatcher are listed here. By clicking on the dispatcher name and company name, you can get the detailed report of dispatcher and company, respectively.
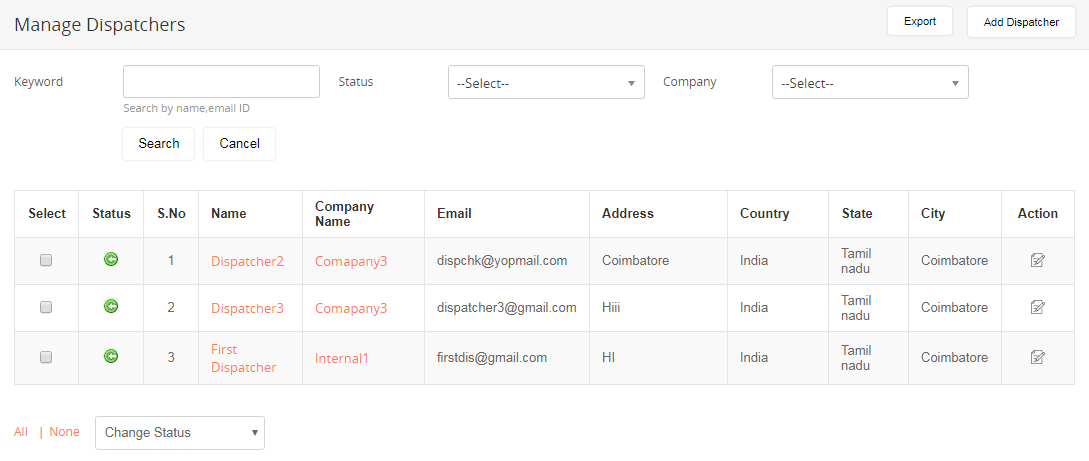
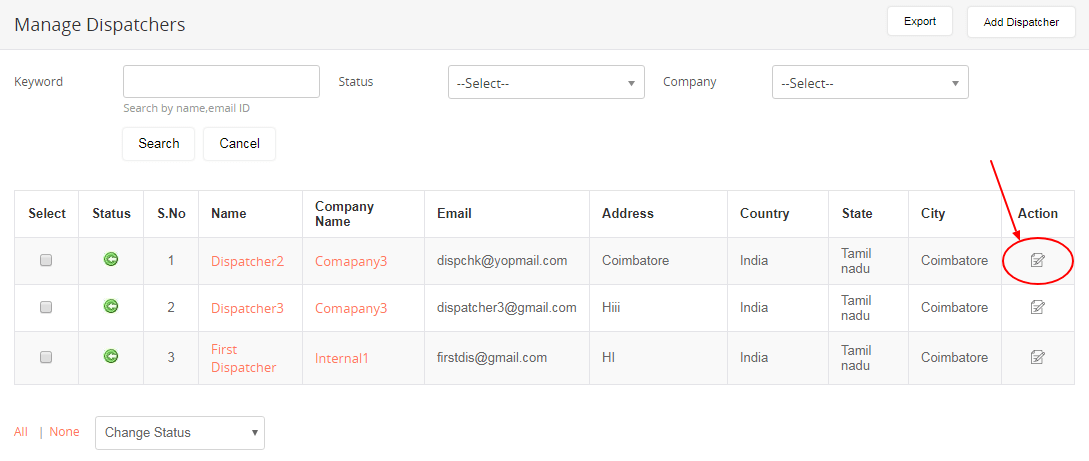
Dispatcher details can be edited and modified according to relevancy by clicking on the “Edit” button in the “Action” column.

The admin can make changes in the “Edit Manager” form and click on the “Submit” button to save changes.
The admin can include any number of dispatchers by clicking on the “Add Dispatcher” button in the right corner.
![]()
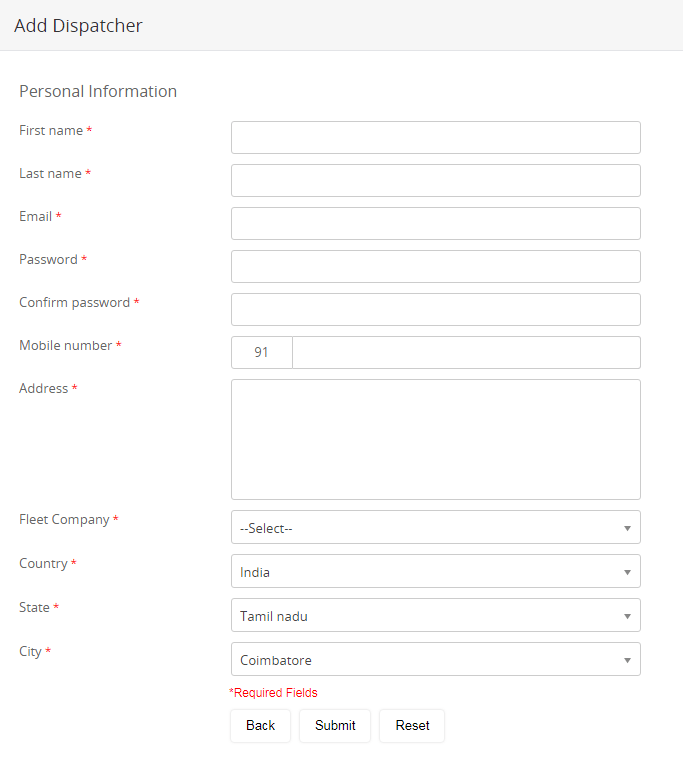
To add a new dispatcher, the admin has to fill up the “Add Dispatcher” form with the required details such as name, address, country, state, city, contact, and company details.
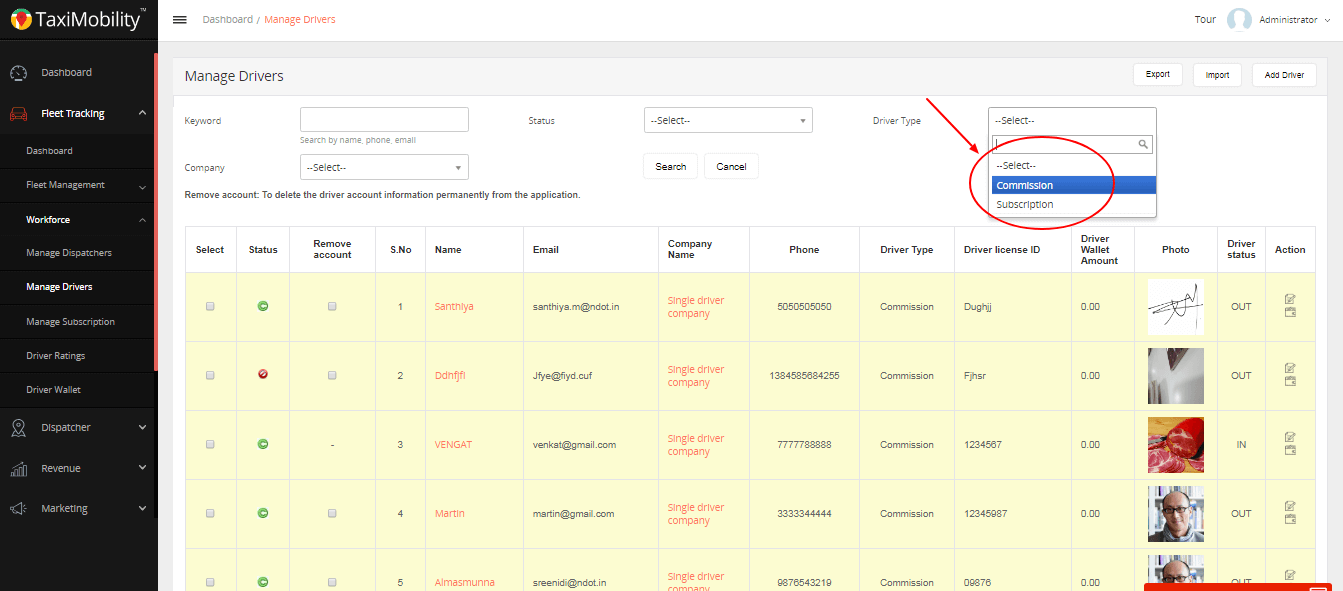
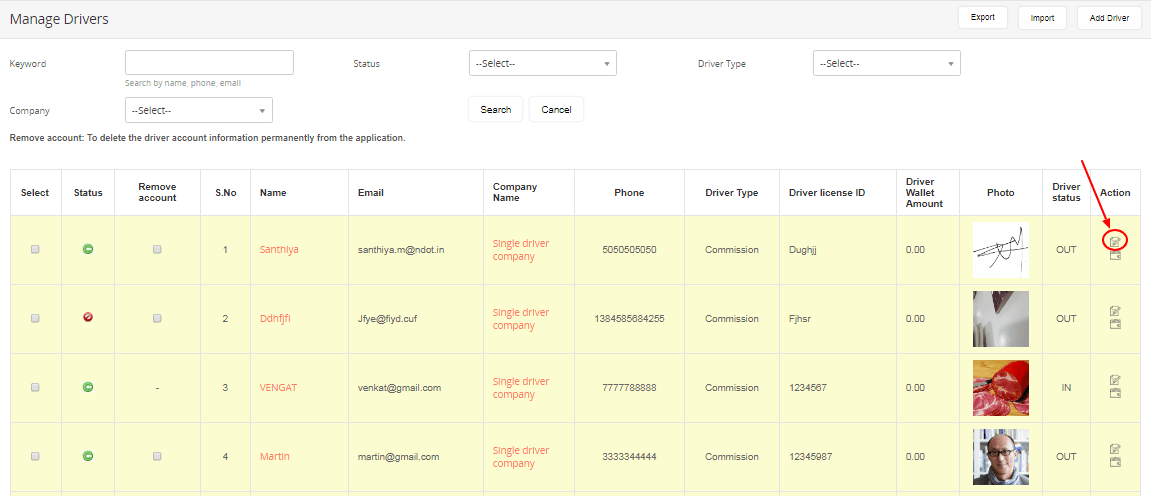
Information on each driver can be edited and modified as per the discretion of the admin. On clicking the image of the driver, a more elaborate report including the status, transactions, trip statistics, and shift history is displayed. The admin can import fleet list or export details using the respective buttons in the top-right corner. The drivers with the driver wallet amount below the fixed minimum amount are highlighted in yellow in the list.
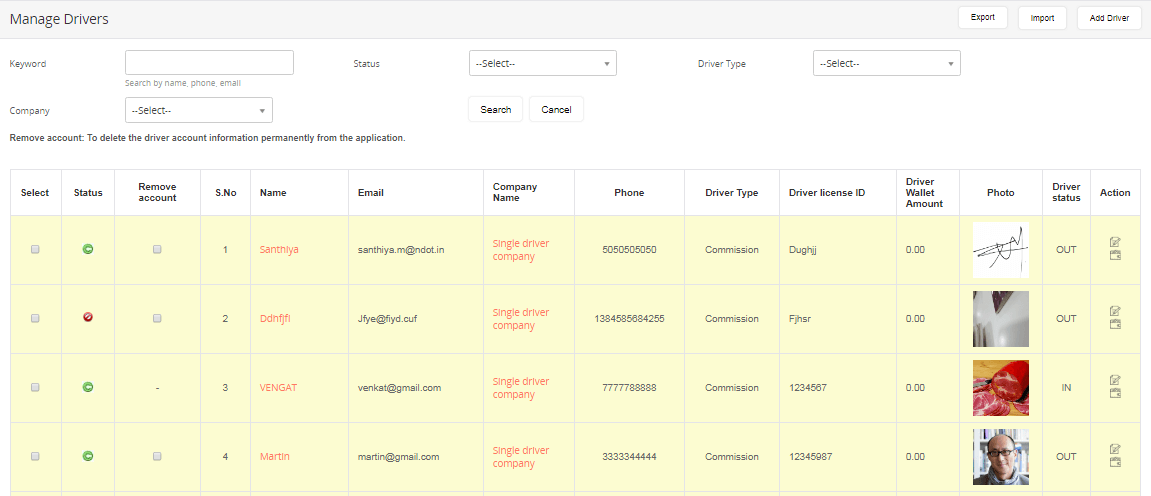
The “Driver Type” drop-down will enable the admin to filter search results based on commission- and subscription-based drivers and manage driver info.
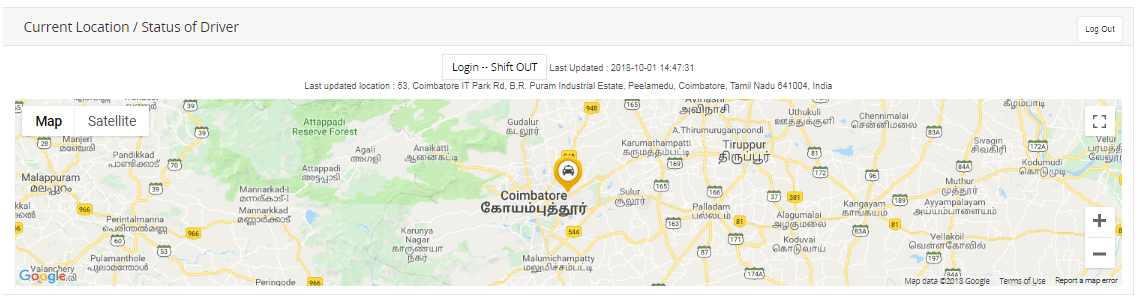
On clicking the name of the driver, the admin can get the complete report of the driver and view the current status of the driver with the location and the time last updated.
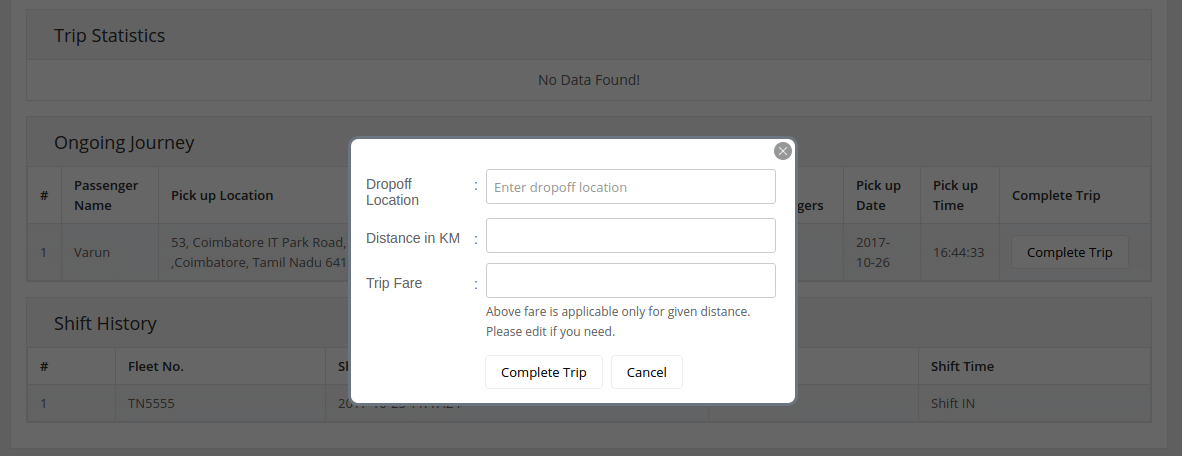
The admin can also view the progress of the ongoing journey. In cases when the driver’s mobile get switched off during the ride, the driver can inform the admin who can then force completion of the ride by manually providing the drop-off location, distance, and ride fare.

Information on each driver can be edited or modified as per the discretion of the admin simply by clicking on the “Edit” button in the “Action” column.
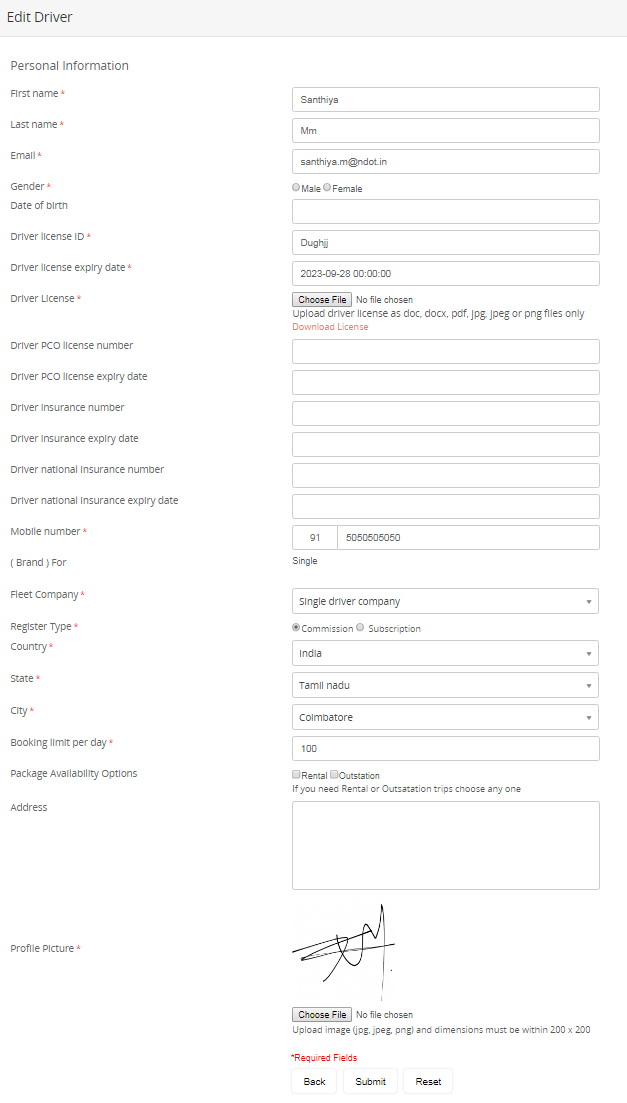
Edit the selected driver details such as personal information and all of their identity credentials. Once done with the editing process, click on the “Submit” button to save the changes made.
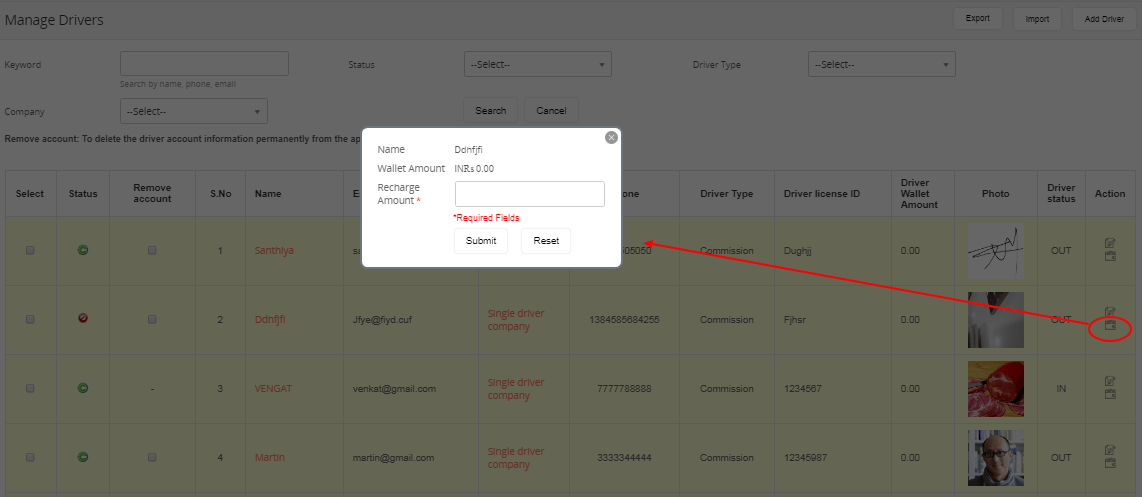
By clicking the “Recharge Money” icon in the “Action” column, the admin can recharge the driver wallet with a certain amount. When the driver receives the ride fare in cash from a passenger, the commission for the admin will be deducted from the wallet. If the passenger pays through the card, the driver commission will be added to the driver wallet.
The admin can add more drivers by clicking on the “Add Driver” button in the top-right corner.
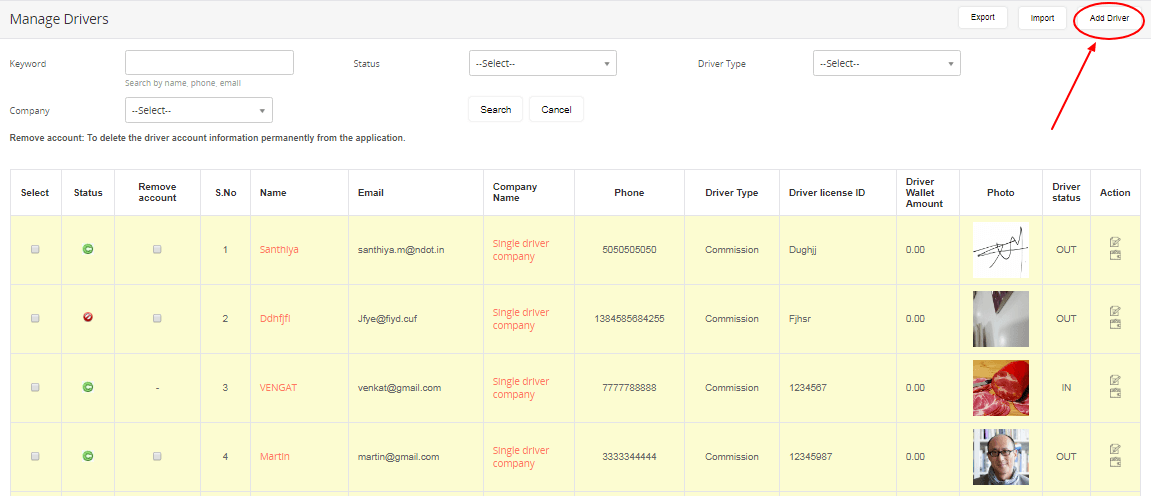

The admin can add any number of drivers to the list including personal information and all of their identity credentials with the photo and driving license details to increase credibility and safety during a trip. The admin can select the brand for each driver as multi or single. In multi brand, the driver operates under a particular fleet company. In single brand, the driver operates directly under the master admin.
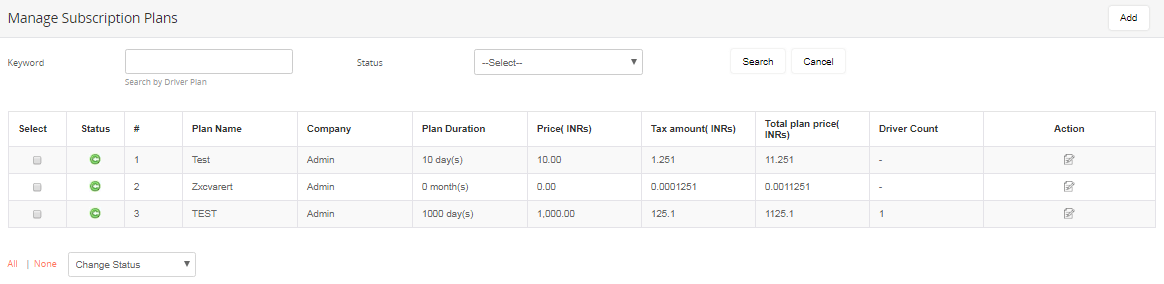
The details of companies and their subscription plans can be tracked from the list using keyword search that can also be edited or modified.
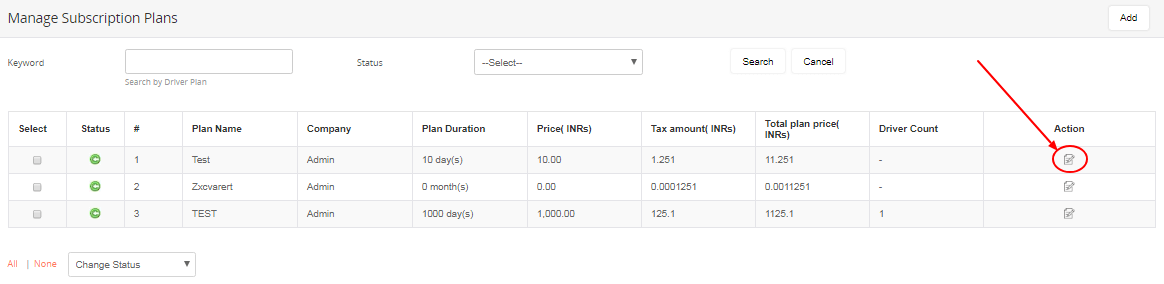
As per the discretion of the admin, the subscription plans can be edited or modified by clicking on the icon in the Action column.
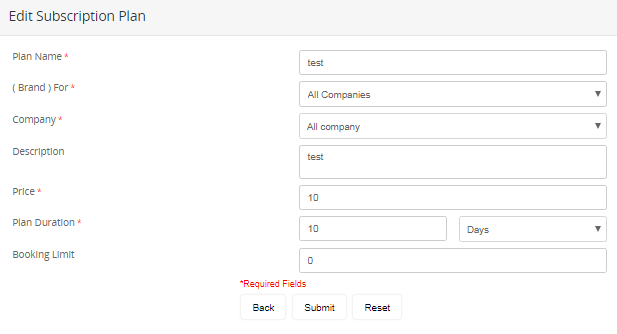
Make necessary changes in the “Edit Subscription Plan” form and press the “Submit” button to save changes.
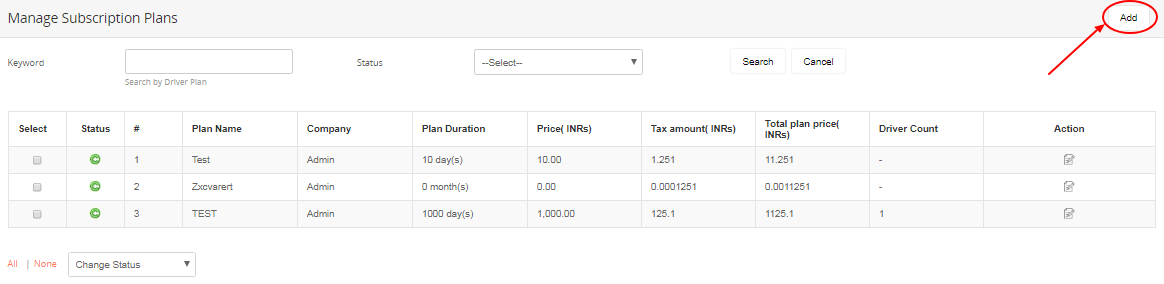
The admin can add new subscription plans by clicking on the “Add” button in the top right corner. The button will redirect you to a page where the admin has to enter all the required details of the plan and press the “Submit” button to create it.
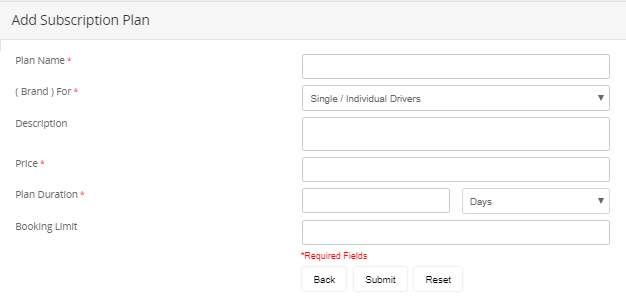
Update the new plan details in the “Add Subscription Form” and click on the “Submit” button.
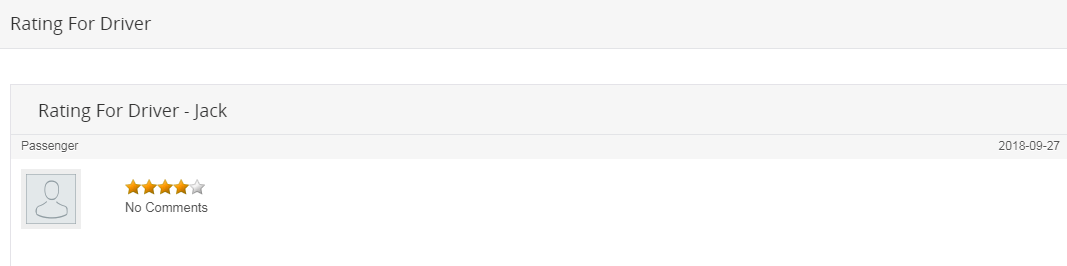
Passengers can rate your drivers. Such details will be listed here for the reference of the admin. By clicking on the "View Details" icon in the "Action" column, the admin can view the individual driver's rating report.

A display of the driver wallet with the company name and the amount of withdrawal from the wallet is provided with the requested date and time. On the request being either rejected or approved, the status is changed accordingly. The report can be downloaded in XLS or PDF format by clicking on the “Export” button on the top-right corner.
